User Management
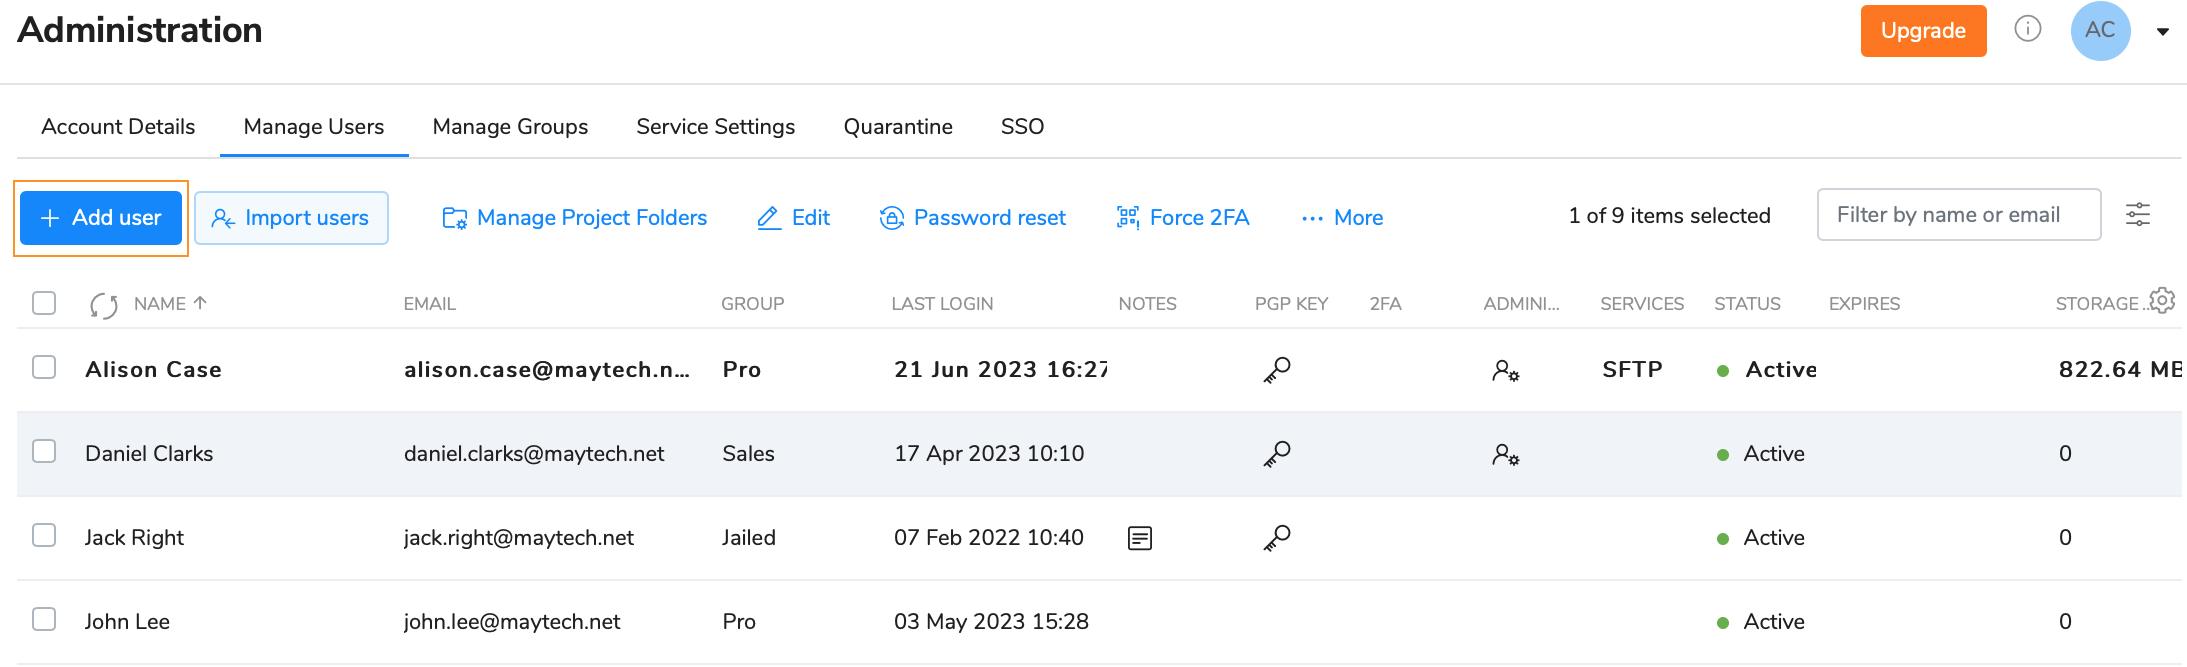
The owner or user with administration rights can manage account users on the Manage Users sub-tab of the Administration tab.
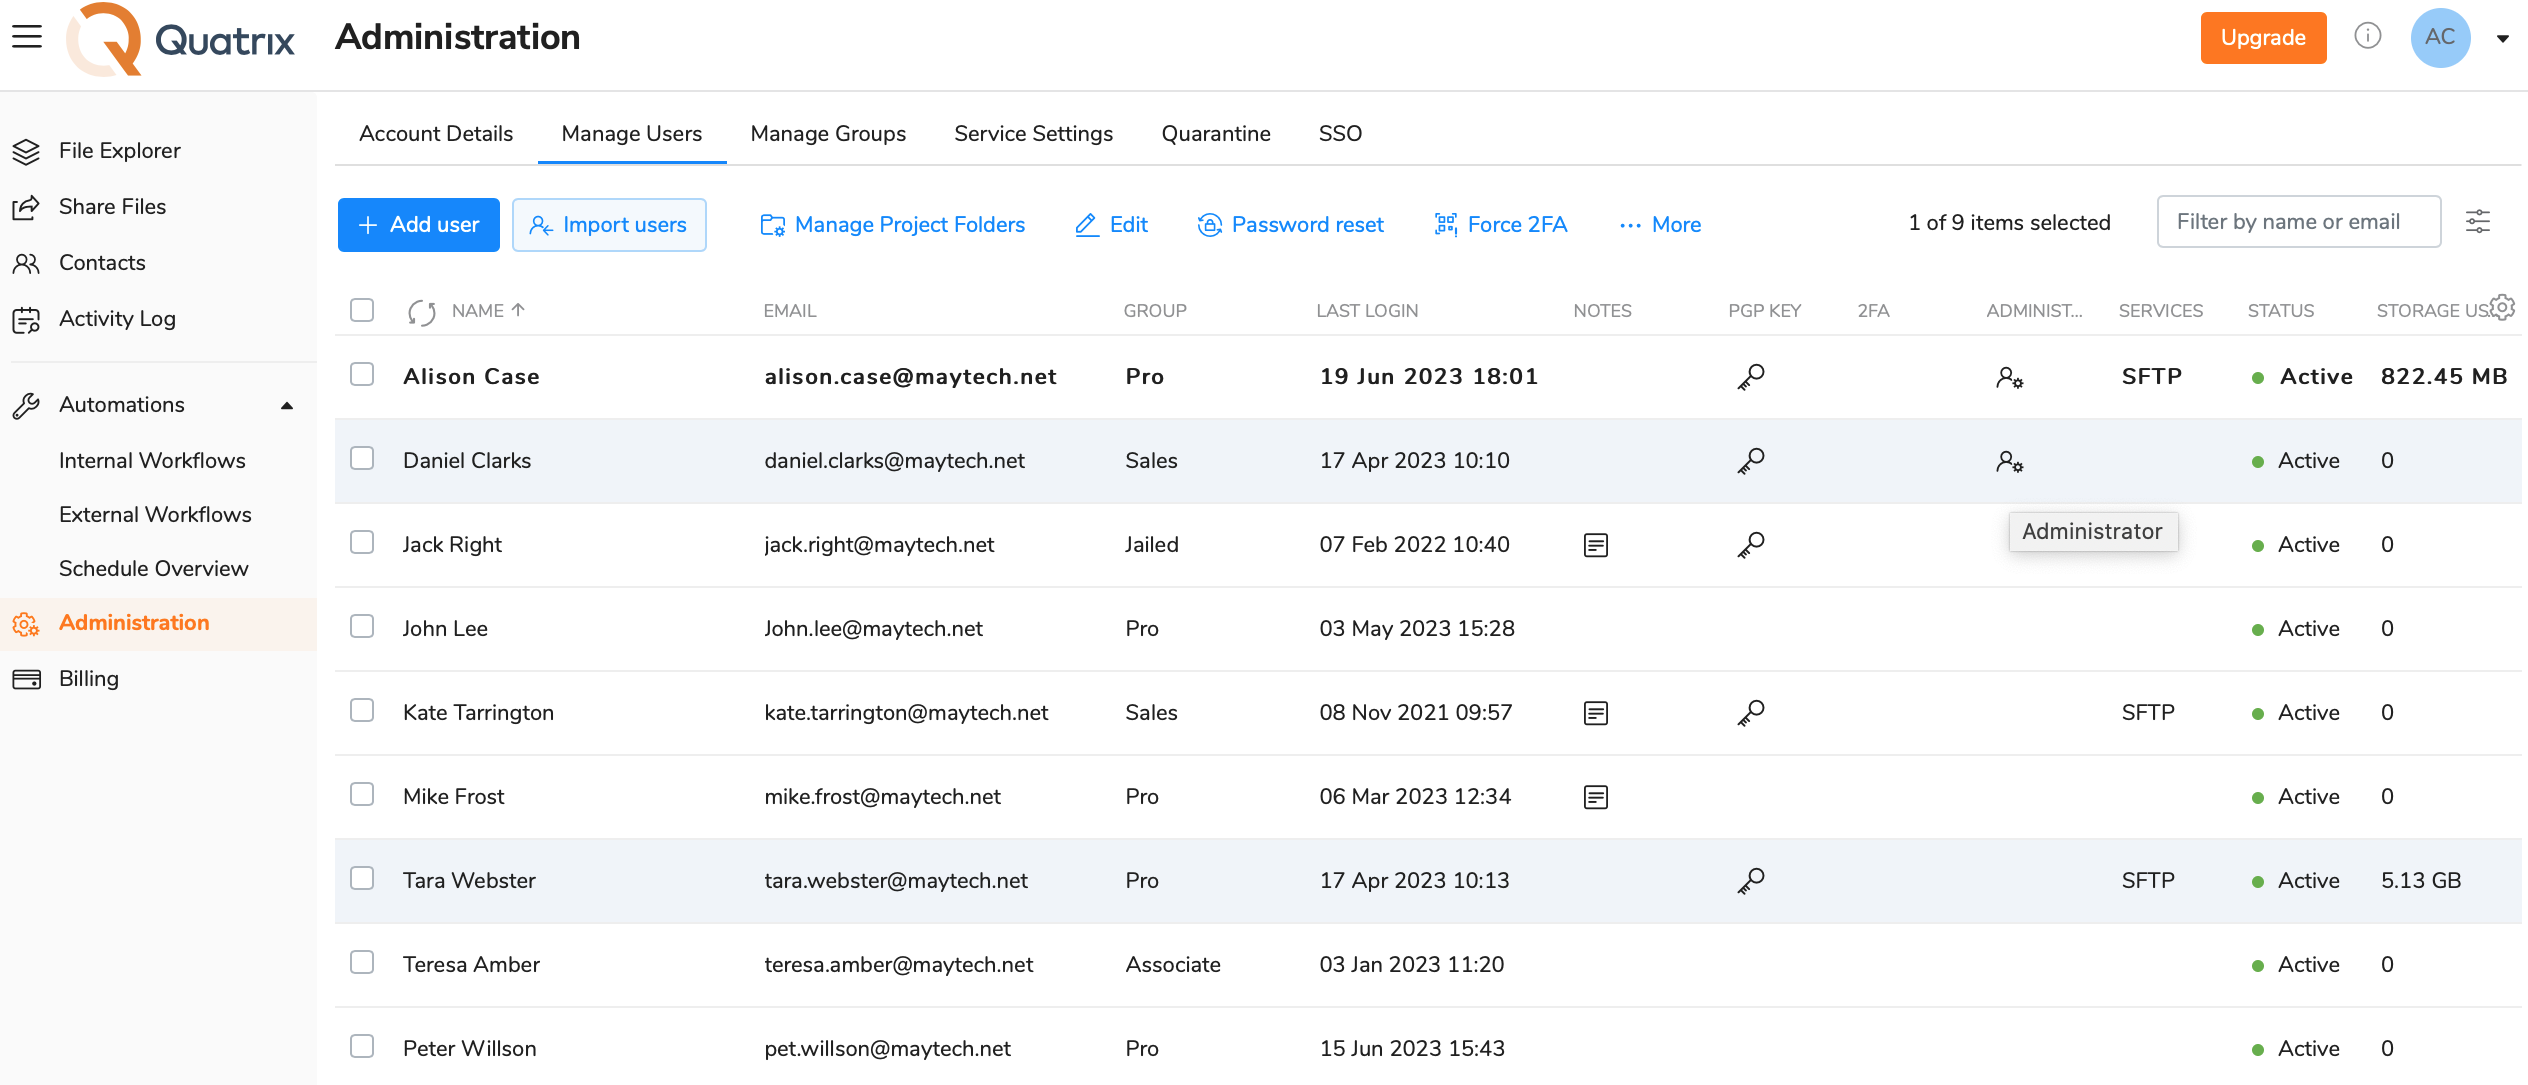
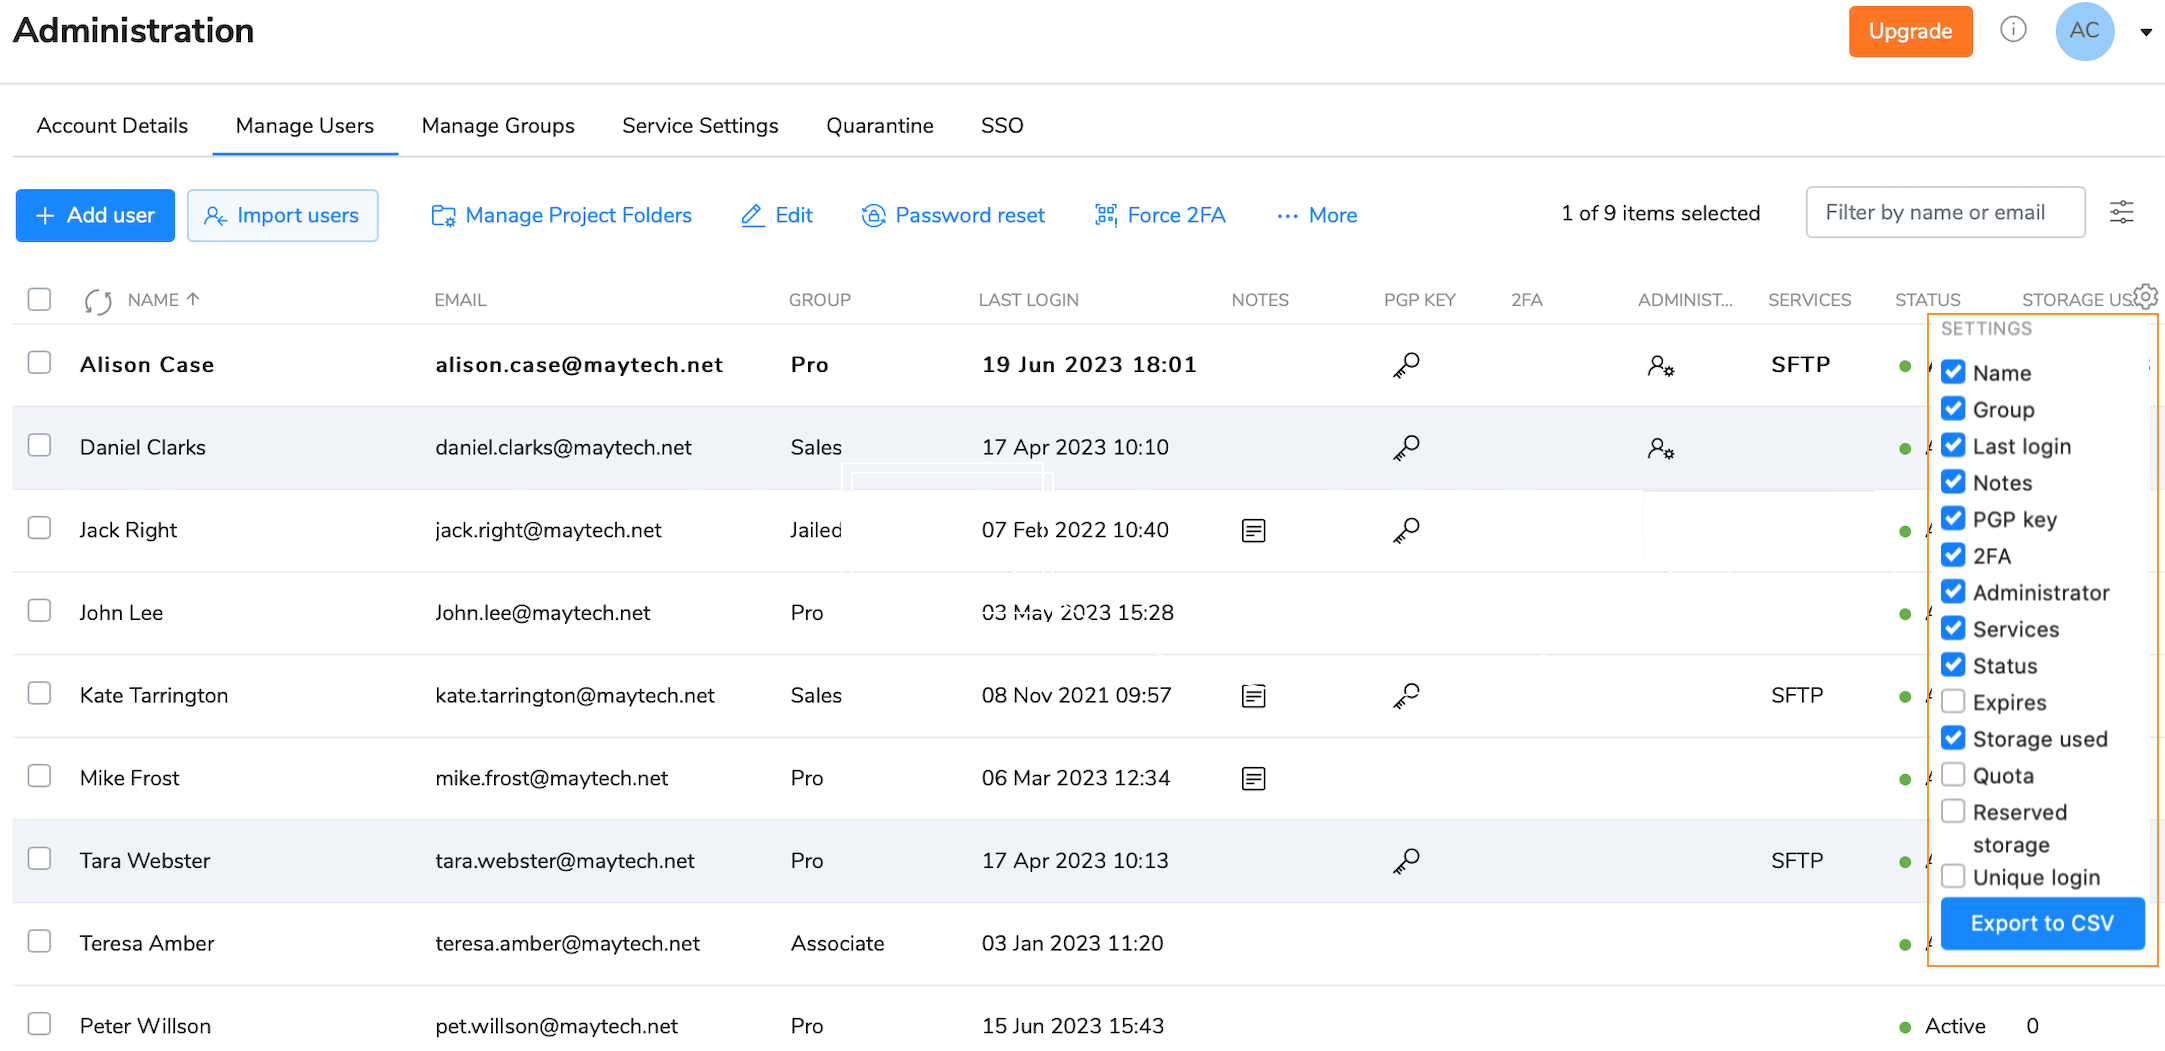
This tab displays a list of users with their names and emails, assigned group, last login date, notes, PGP keys, 2FA, admin rights, SFTP availability, status and used storage. You can adjust the display of the table to your needs by clicking on the gear icon and selecting necessary columns from the list.
Besides you can download user metadata in CSV format by clicking on the Export to CSV button. See the screenshot below.
User groups
User groups are a great way to share your account with multiple users with your desired sharing and access permissions.
As an owner or admin, you can allow users of a specific group to share and request files, to track shares, to manage personal or site contacts, users and automations.
It's quite easier to handle permissions if they are in groups rather than with individual users. When you grant access to Automations for the sales manager and adjust required sharing permissions, it will be a painful and time-consuming job to reset all permissions to another user when a new sales manager joins the company. User groups simplify your work here, all you need to do is to add a new user to the required group.
The following 3 predefined user groups are created by default:
- Pro Users can view and share files with other Pro users, Associate users and site contacts. Besides they can create a list of their own Personal Contacts that are invisible to you as the administrator.
- Associate Users can view only Pro users and share files with them. They cannot share to the outside world. This facilitates the flow of data from external partners into your organisation whilst preventing external partners from making unauthorised use of your Quatrix site.
- Jailed Users have access to files from Projects Shared With Me.
Permissions of predefined user groups can be updated.
Adding a user group
- Go to Administration and open Manage groups sub-tab.
- Click on Add group button which opens a form for creating your group.
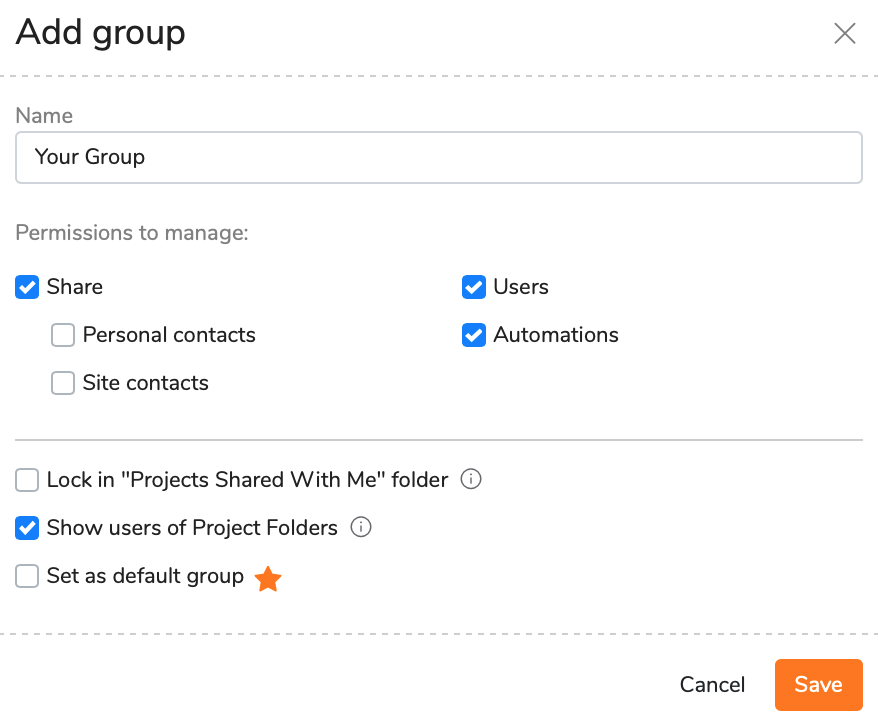
Name your group and select permissions for group members:
- Share - share and request files; tracking;
- Personal contacts - add, edit or delete your personal contacts;
- Site contacts - add, edit or delete site contacts;
- Users - manage users of the linked groups;
- Automations - create, update and delete automations.
- Tick the check box Lock in Projects Shared With Me folder if you would like to jail your group members only to the folder with the shared PFs.
- Tick the box Show users of Project Folders if you want to make users of PFs and their permissions visible to group members.
You can make your group a default one by ticking Set as default group. It will be displayed with the orange star in the list of groups.
When you add a new user and select the default group, it won't be Pro if you updated it to your desired group, but your changed one.
- Click Save and your group will be added to the list on the Manage Groups sub-tab.
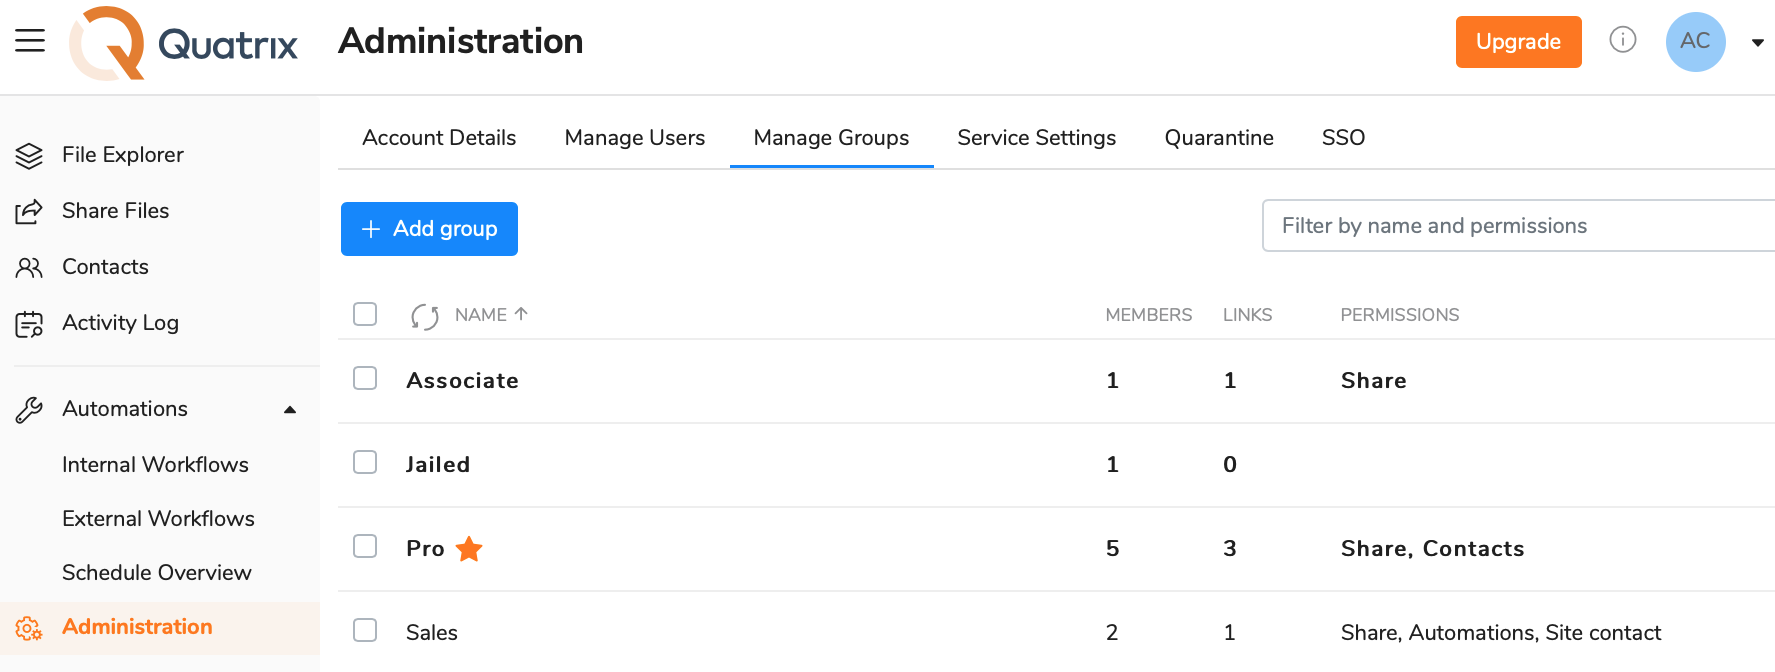
All your created user groups are added to the list on the Manage groups sub-tab and displayed in alphabetical order.
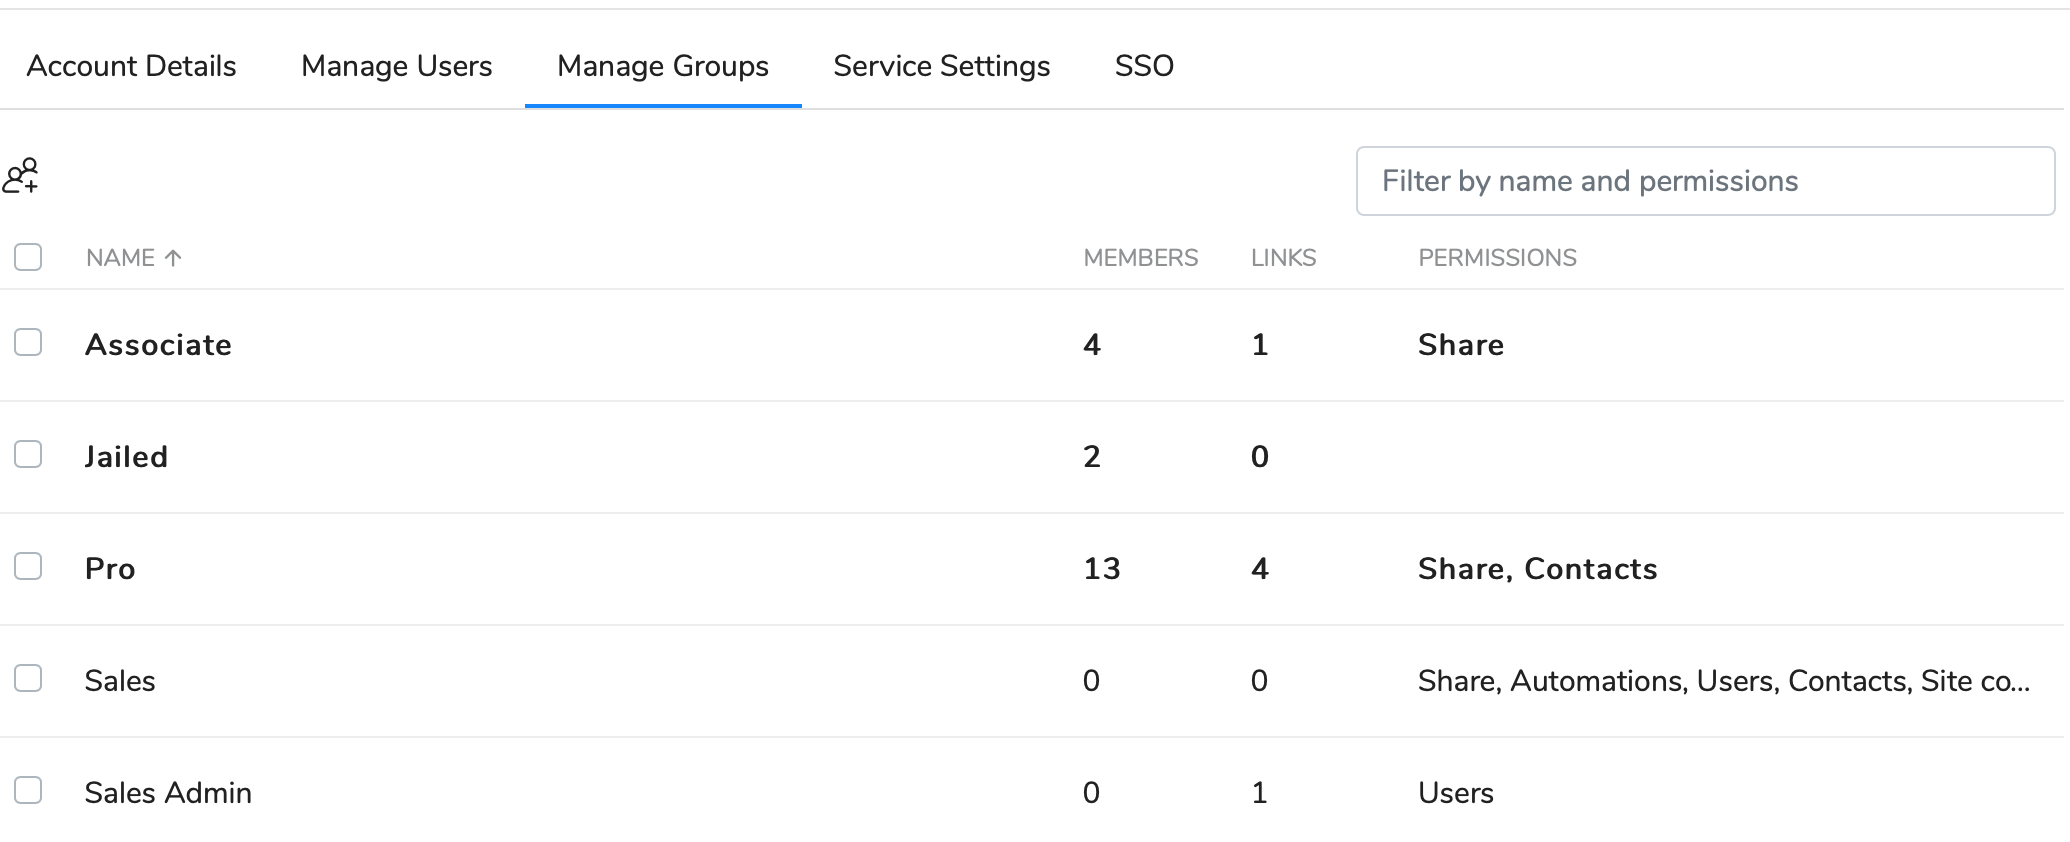
The table with groups displays number of group members, number of linked groups and a brief description of assigned permissions.
You can filter table contents by name or permissions.
Managing user groups
Adding or deleting group members
Once the group is created, you can add group members by clicking on Manage users button from the top menu (or select an appropriate option from the right-click menu).
The form Manage users allows you to add users to the group or move them to the desired group.
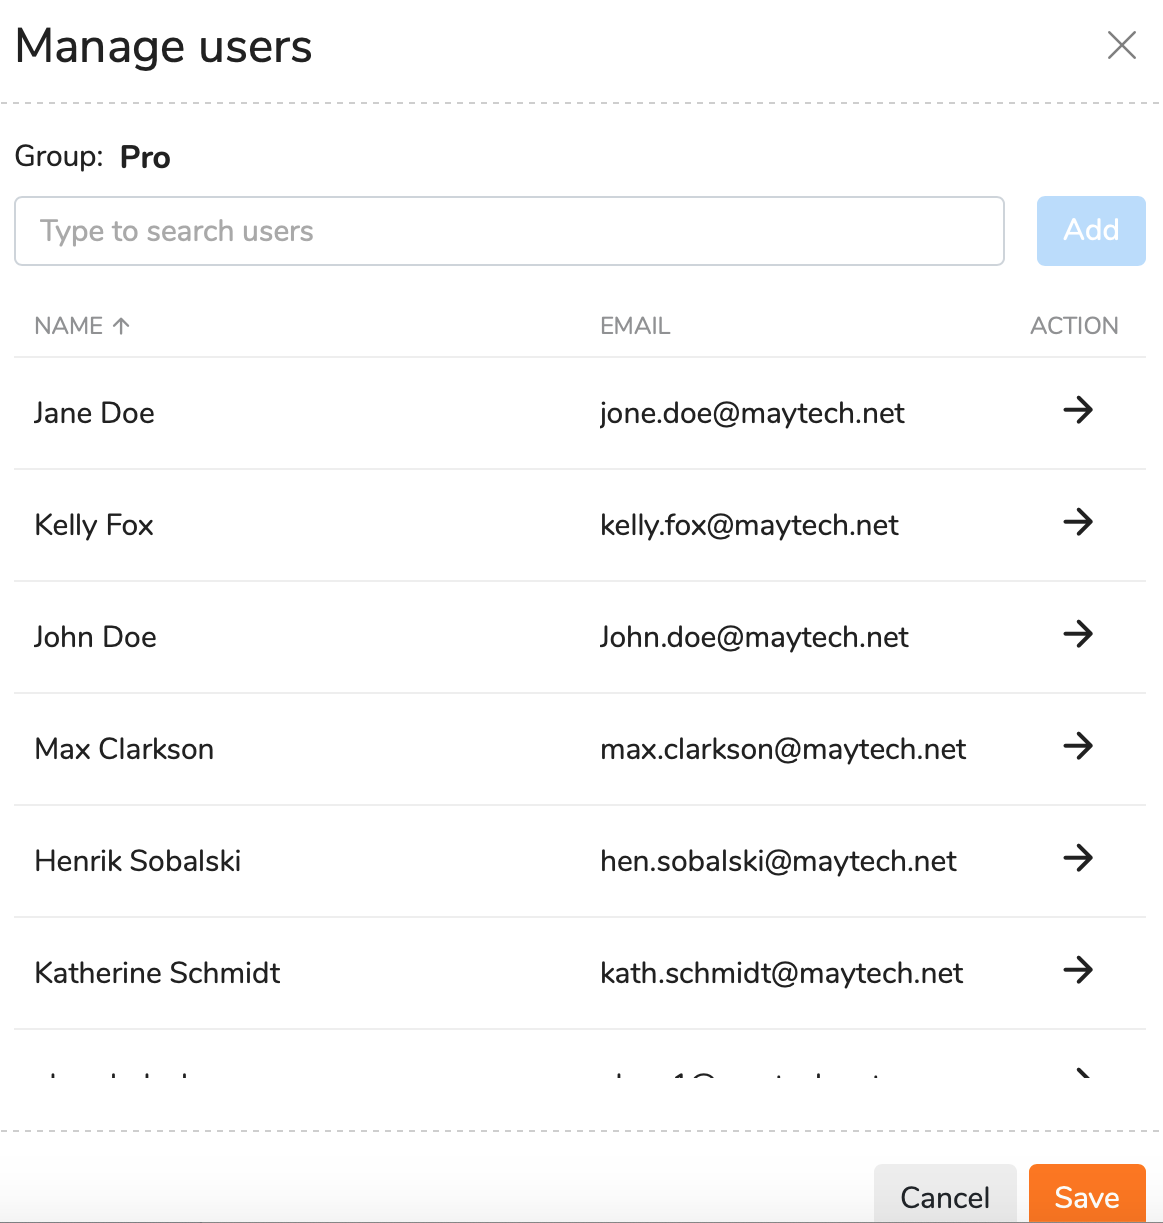
A user can belong to one user group.
Owners or administrators determine permissions allowed for group members and this is under their responsibility to inform the users about any changes in the group.
Users are not automatically notified that they are added or deleted to a specific group. They would be able to perform actions according to allowed permissions.
Managing group access
You can manage the access of group members to specific groups, including site contacts, on the Access to form which can be opened by selecting a appropriate option from the top or right-click menu.
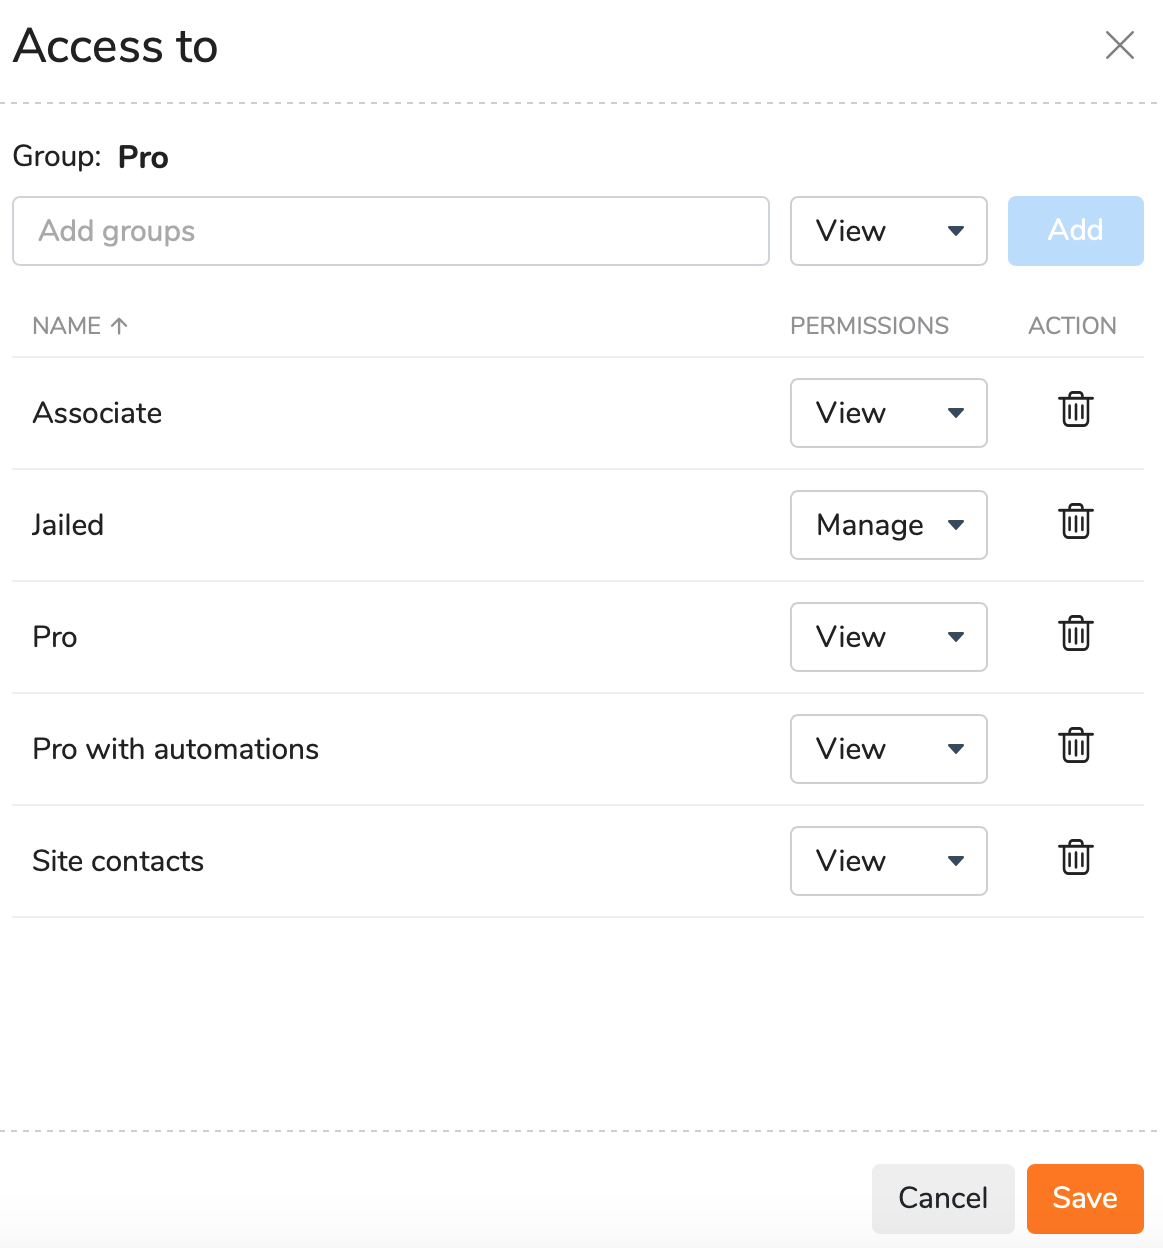
- Open the Access to form by clicking on the corresponding button from the top menu.
- Type the group or select it from the drop-down list.
- Determine what access type you would like to apply:
- View - display members of the linked group;
Manage - add, edit and delete members of the linked group.
The group with less permissions cannot manage the one with more permissions, their members can have only View permission.
- Add groups and save.
Your added groups are displayed in the list where you can edit permissions or delete some groups from the list.
If you created a group without adjusting appropriate group access, in other words you didn't link any groups or contacts to your group, you won't be able to perform specific actions in the account e.g. file sharing cannot be performed as there aren't required members in the list.
You can link other groups or contacts to your group on the Access to form as described above.
Editing a user group
You can simply edit your user group by selecting an appropriate option from the top or right-click menu.
All permissions of predefined groups (pro, associate, jailed), except names, can be edited.
Deleting a user group
Any group you created can be easily deleted by clicking the Delete icon from the top menu.
Predefined groups (pro, associate, jailed) cannot be deleted.
The Delete group form allows you to move group members to another group by selecting a appropriate one from the drop-down list.
User groups are intended to help you make your user management easier and more effective.
Adding a user
If you would like to add a new user to your Quatrix account, follow the steps below:
- Go to the Administration tab and open Manage users sub-tab.
- Click on the Add user button from the top menu.
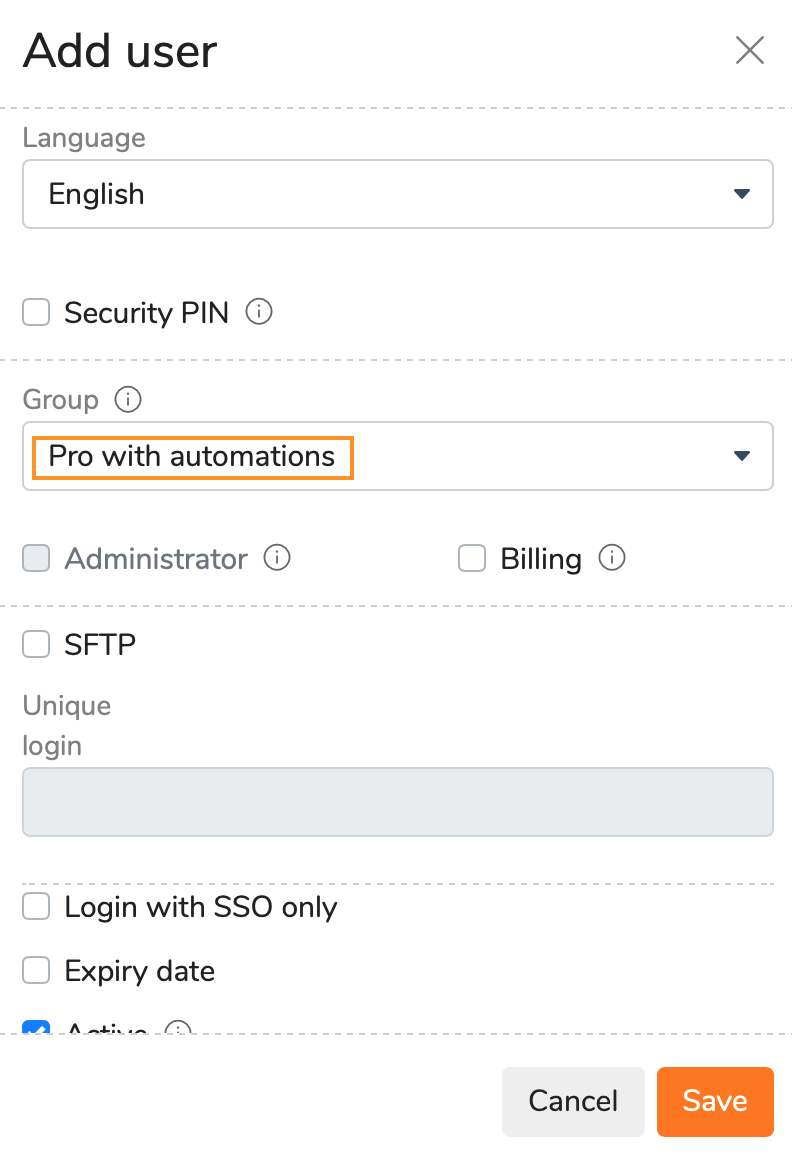
- Specify your user details and additional adjustments on the Add user dialog box:
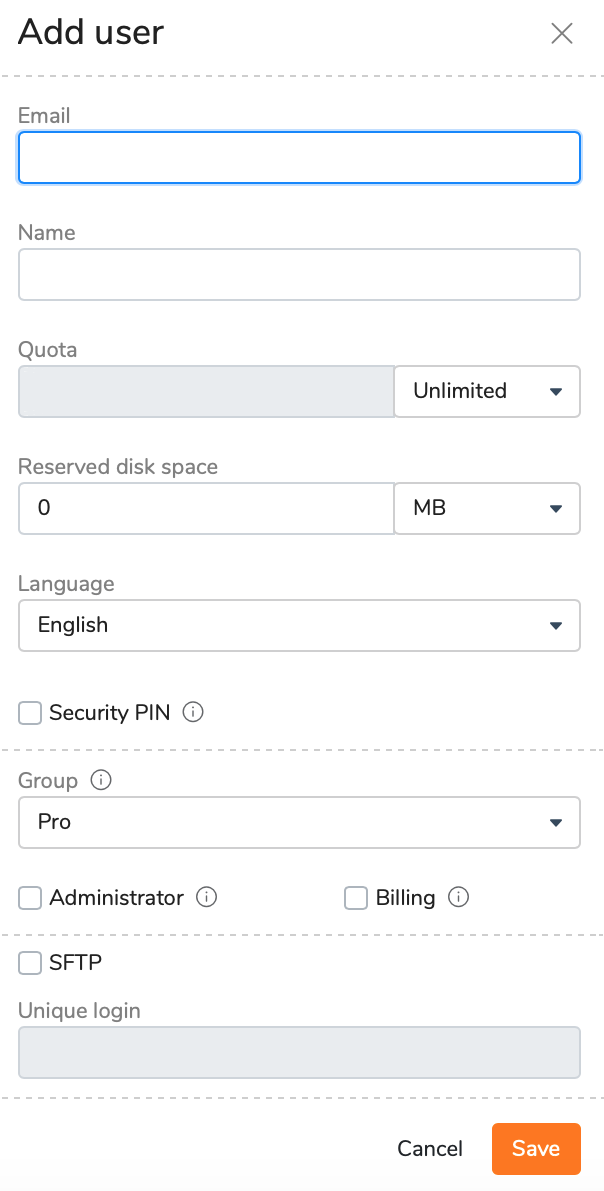
- user name and email
- quota - unlimited by default (=account storage), you can specify the storage limit for this user
- reserved disc space - specify if you wish to reserve specific amount of storage to your desired user
- language - English, German or Chinese
- security PIN - optional PIN the user must enter when registering and setting password
- user group - Pro, Associate or Jailed (predefined) or your own group. Learn more about user roles and their permissions
- administrator rights - only to pro users
- billing - permission to manage invoices and payments (only to pro and associate users)
- unique login - if you wish your user to log in to SFTP using unique login credentials
- login with SSO only - allows the user to access his account only using SSO
- SFTP - permission to use SFTP
- active - activate or deactivate the user. Deactivated users won't be able to log in
- expiry date - set the time up to which the user can log in and use Quatrix services
- notes
- Click on the Save button.
For additional security, you can adjust a security PIN for the user to enter while registering to Quatrix.
Adding multiple users at once
In order to save your time for manual adding of multiple users (e.g. 50 or 100), you can use our Import users from CSV file feature. It allows to automatically add your users from previously generated CSV file.
Follow the steps below to add multiple users:
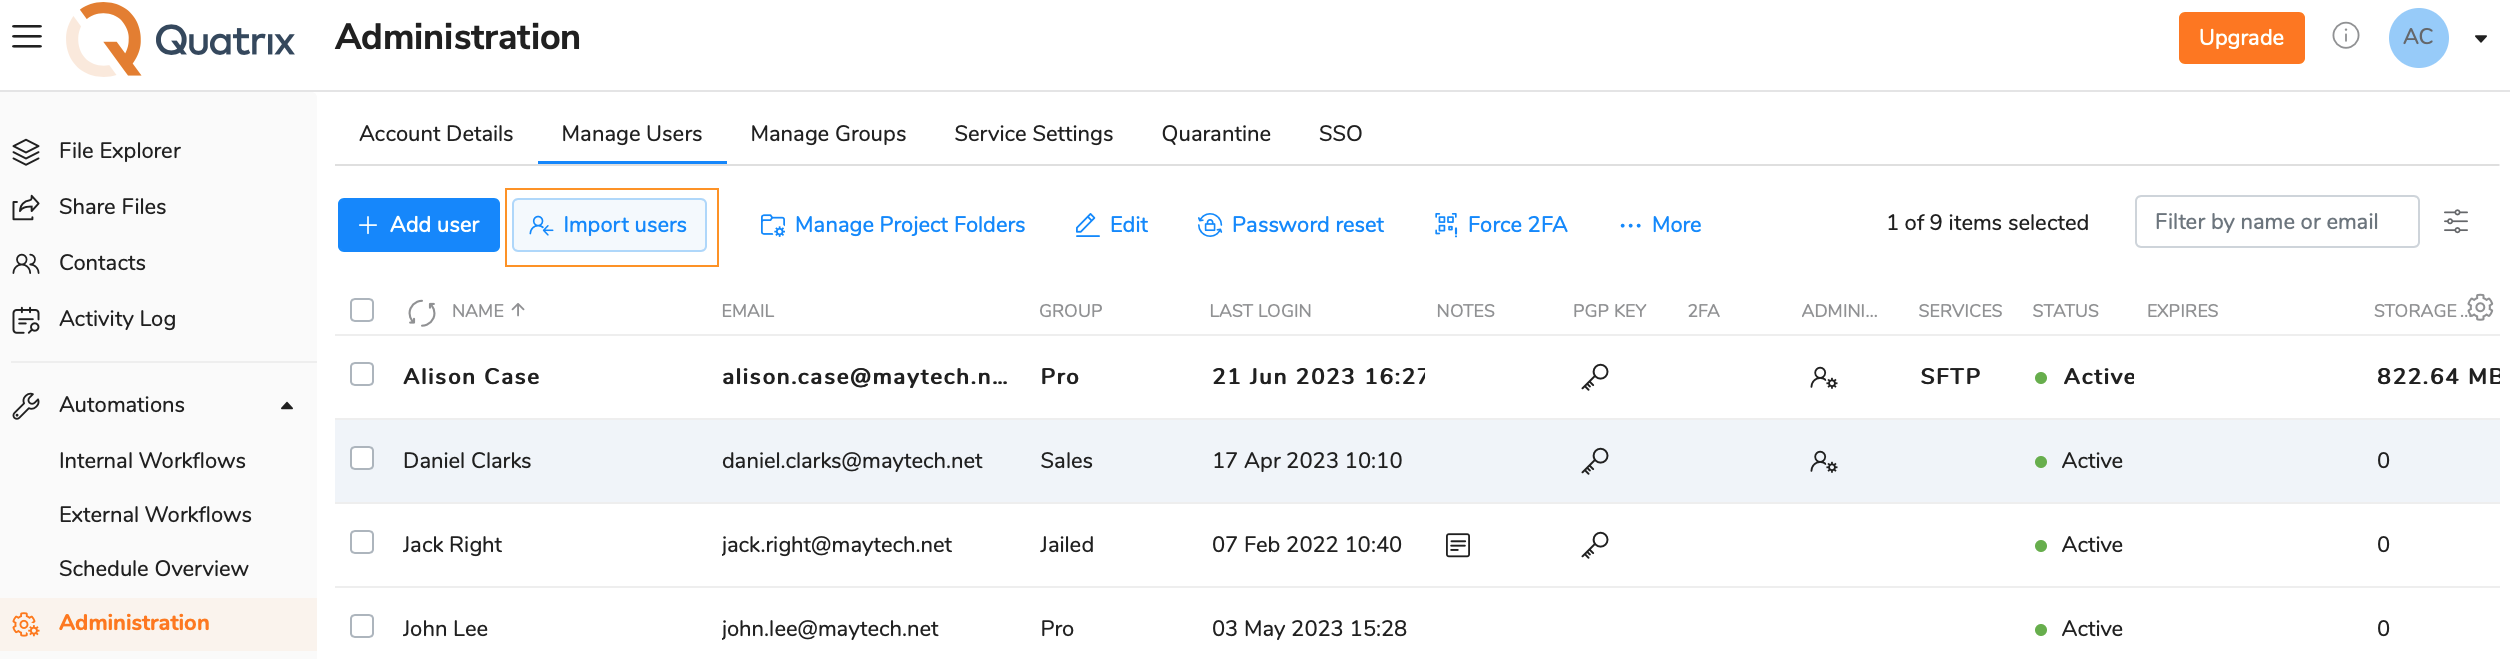
- Click on Import users button from the top menu on the Manage users sub-tab.
- Prepare CSV file that should contain the following fields:
- user email
- user name
- status (active or not)
- Administrator - - yes or no
- user group - pro, associate, jailed (predefined) or any that you created
- PIN - learn details on Adjust PIN code user registration access.
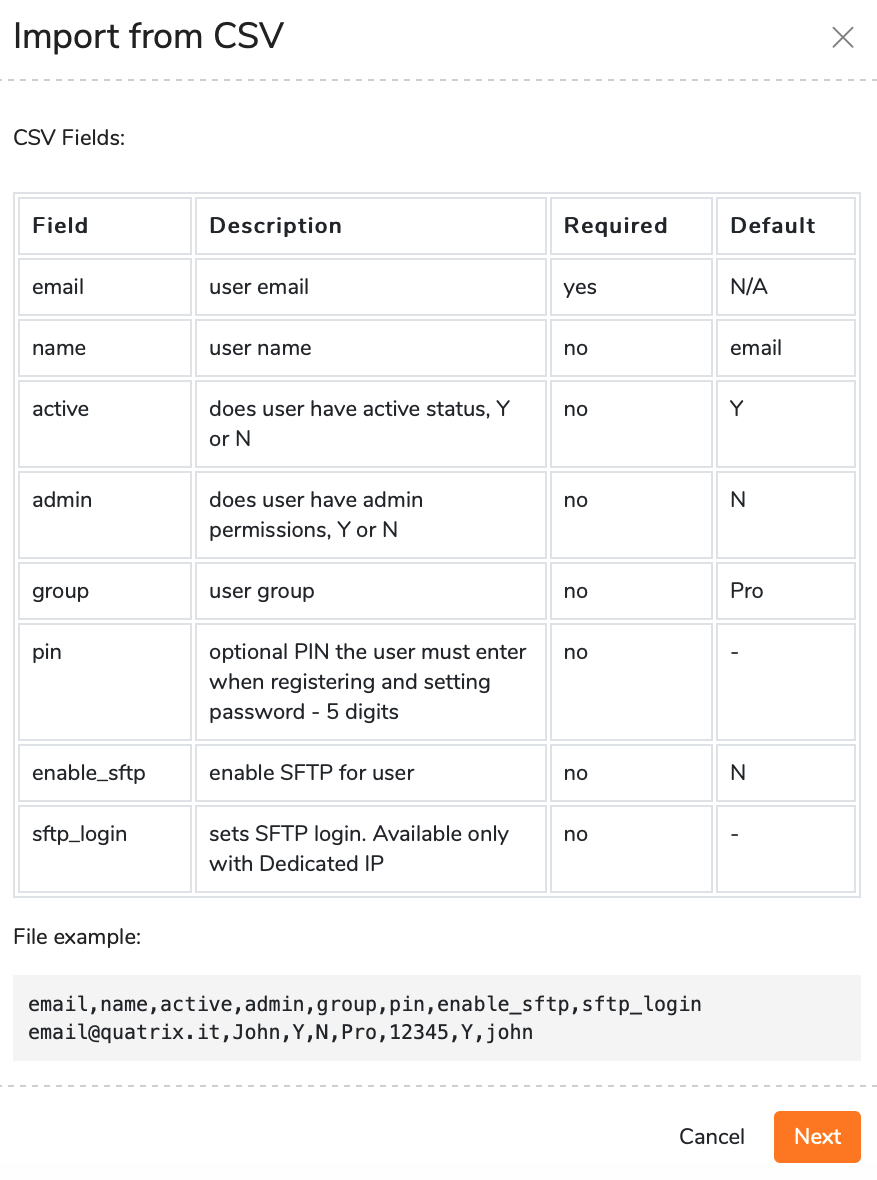
- Click on the Next button, choose your CSV file and click on Import.
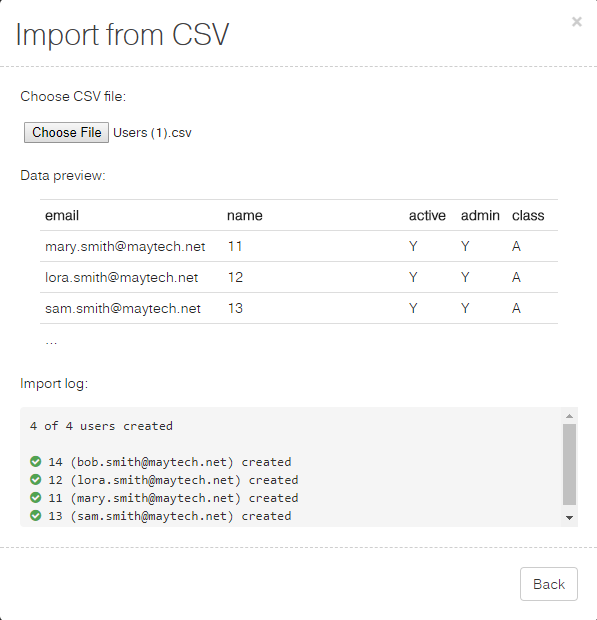
As soon as the import is completed, your users will be automatically added to the account.
Emails already stored in Quatrix won't be imported. If the format is not corresponding, the import won't be allowed until it is corrected.
SFTP can't be adjusted while importing. It can be adjusted while editing one or multiple users.
A CSV file would be rejected if it contains more records than available licences.
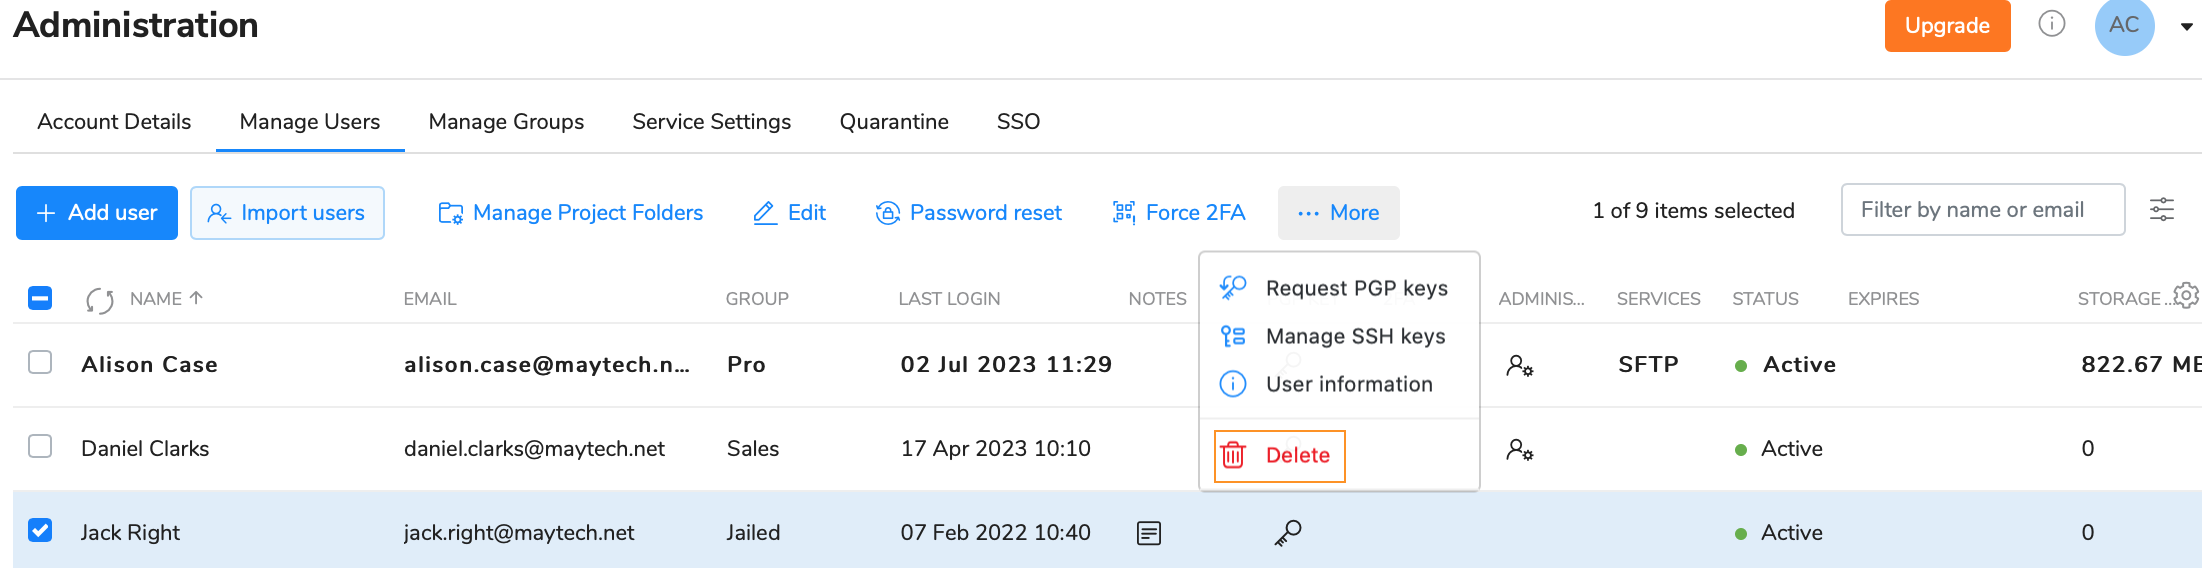
Getting user info
In order to learn more details about your user, select the check box next to the desired one, click on More from the top menu and select the User information option. This opens the form with details about the user.
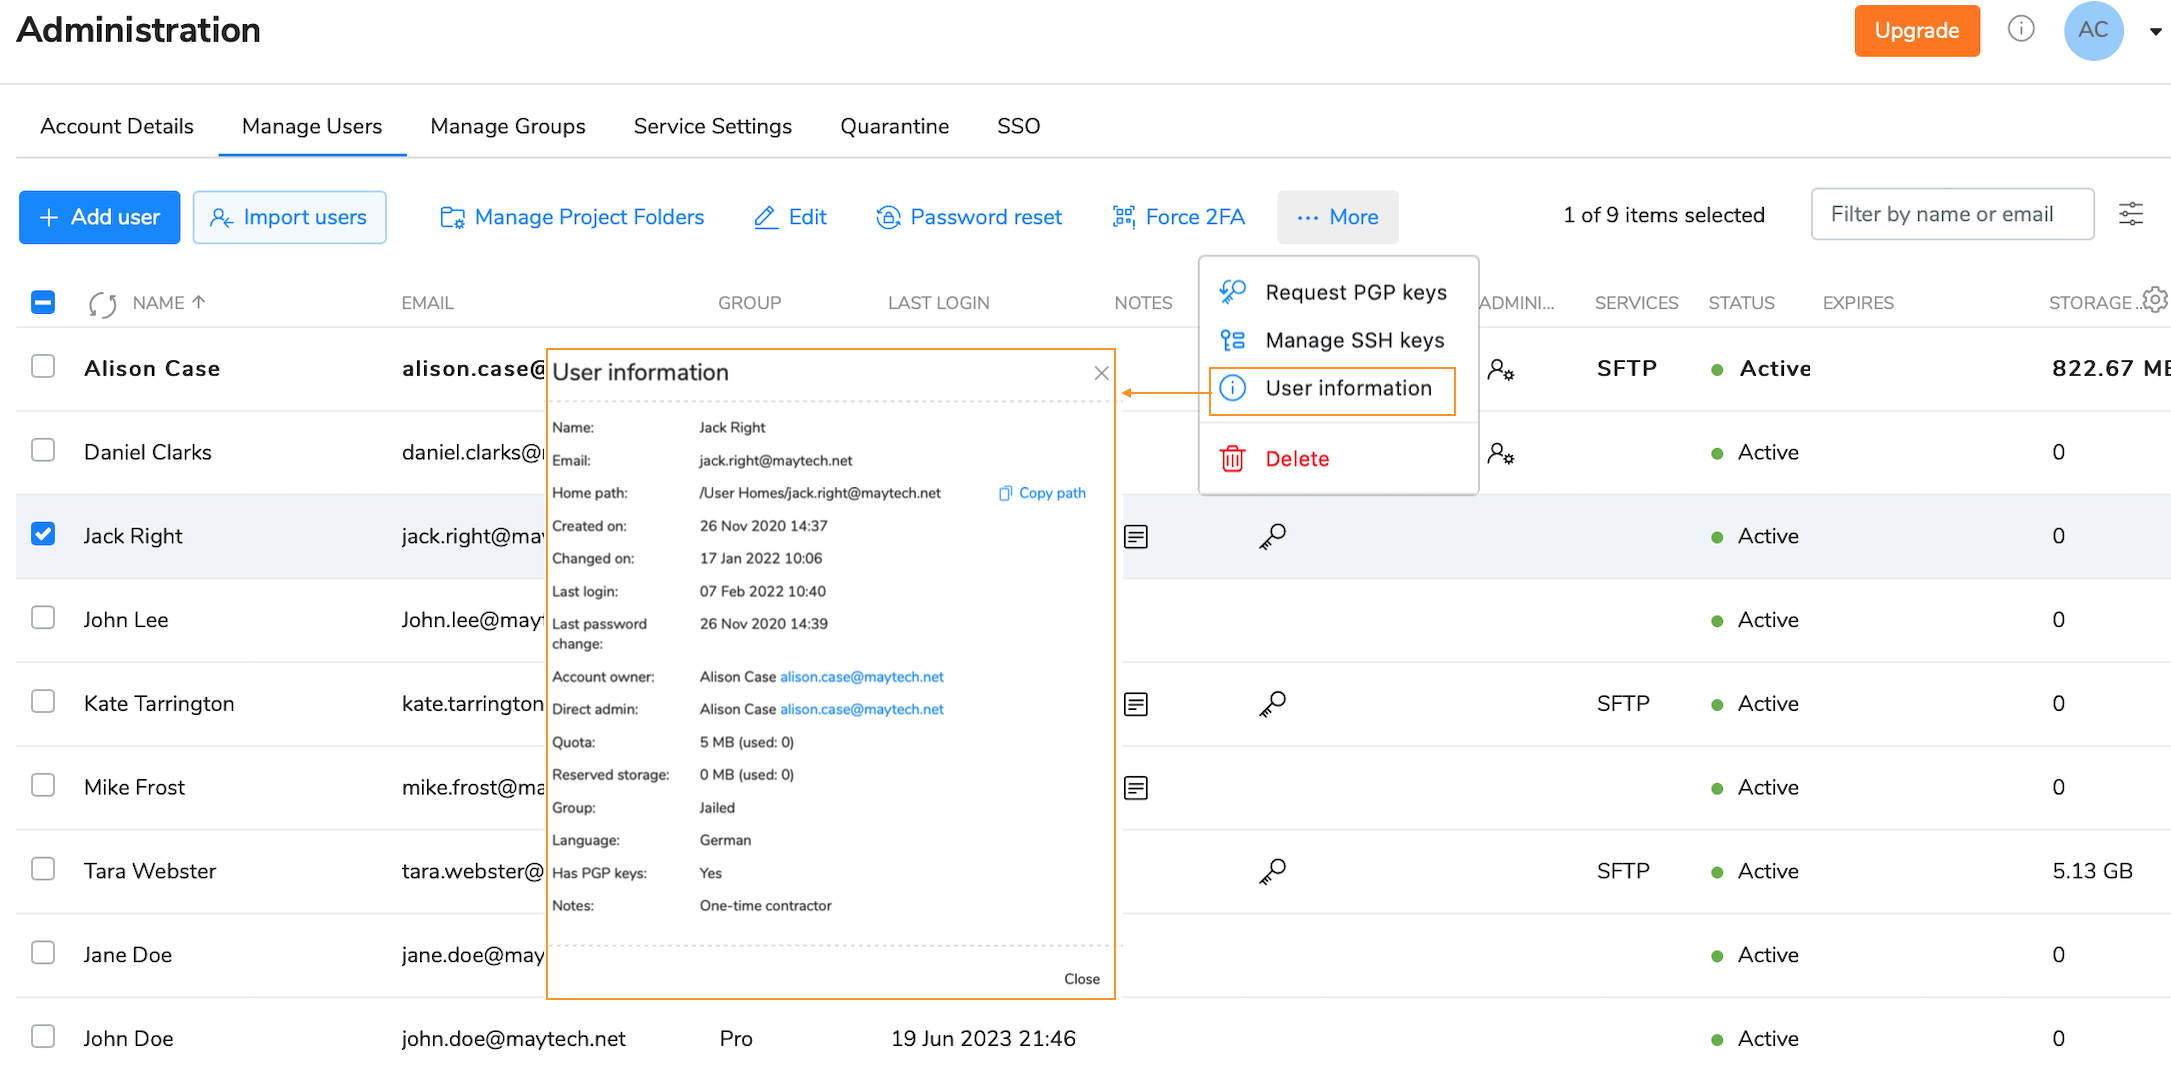
The form displays user's name and email. path to the home folder, dates when the user was created or updated, last logged in and last changed the password, account owner and direct administrator (the admin who created the user), assigned quota limit, reserved storage amount, group, language, PGP keys and notes.
Editing a user
To change user details or update permissions:
- Select the check box next to the user you would like to edit and click on the Edit button from the top or right-click menu.

Change user details in the Edit user dialog box.
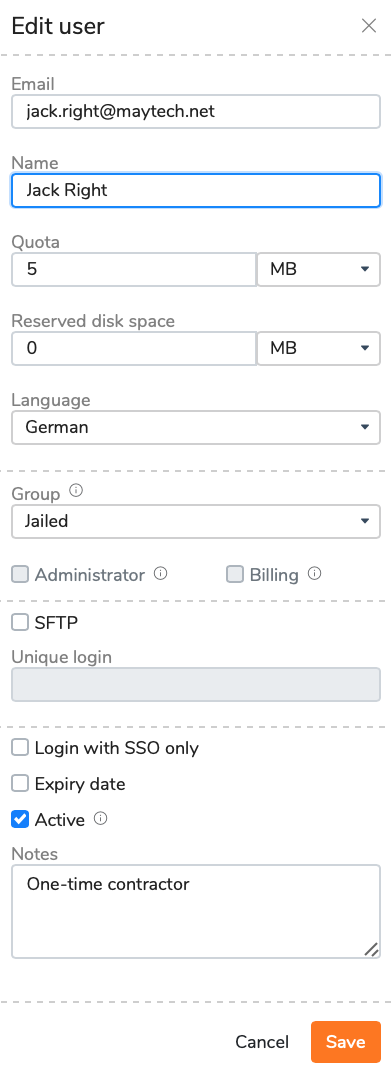
Click the Save button.
You get the notification that the user's profile has successfully been edited.
Possible user update cases:
- if you would like to set the limit for user storage, specify the quota amount, reserve some storage;
- user group update allows you to control account access permissions e.g. you can update pro user to jailed user that limits the access to only Projects shared with me folder;
- grant administrative or billing rights if you would like your user to cover account administration or invoice payment;
- enable or disable SFTP;
- activate or deactivate the user - make your account unavailable to access;
- set the expiry date when the service will be unavailable;
- update login methods - unique login or SSO only;
- switch the language of the user: from English to German or Chinese, or vice versa.
Deleting a user
To delete a user select the check box next to the user you would like to remove, click on the Delete option from the top menu and confirm the deletion. The deleted user won't be able to access their Quatrix account.
If you tick the Delete Home Folder check box while confirming the deletion, all files of the selected user will be deleted. If not, their home folder will stay in the file system and you will be able to access it.

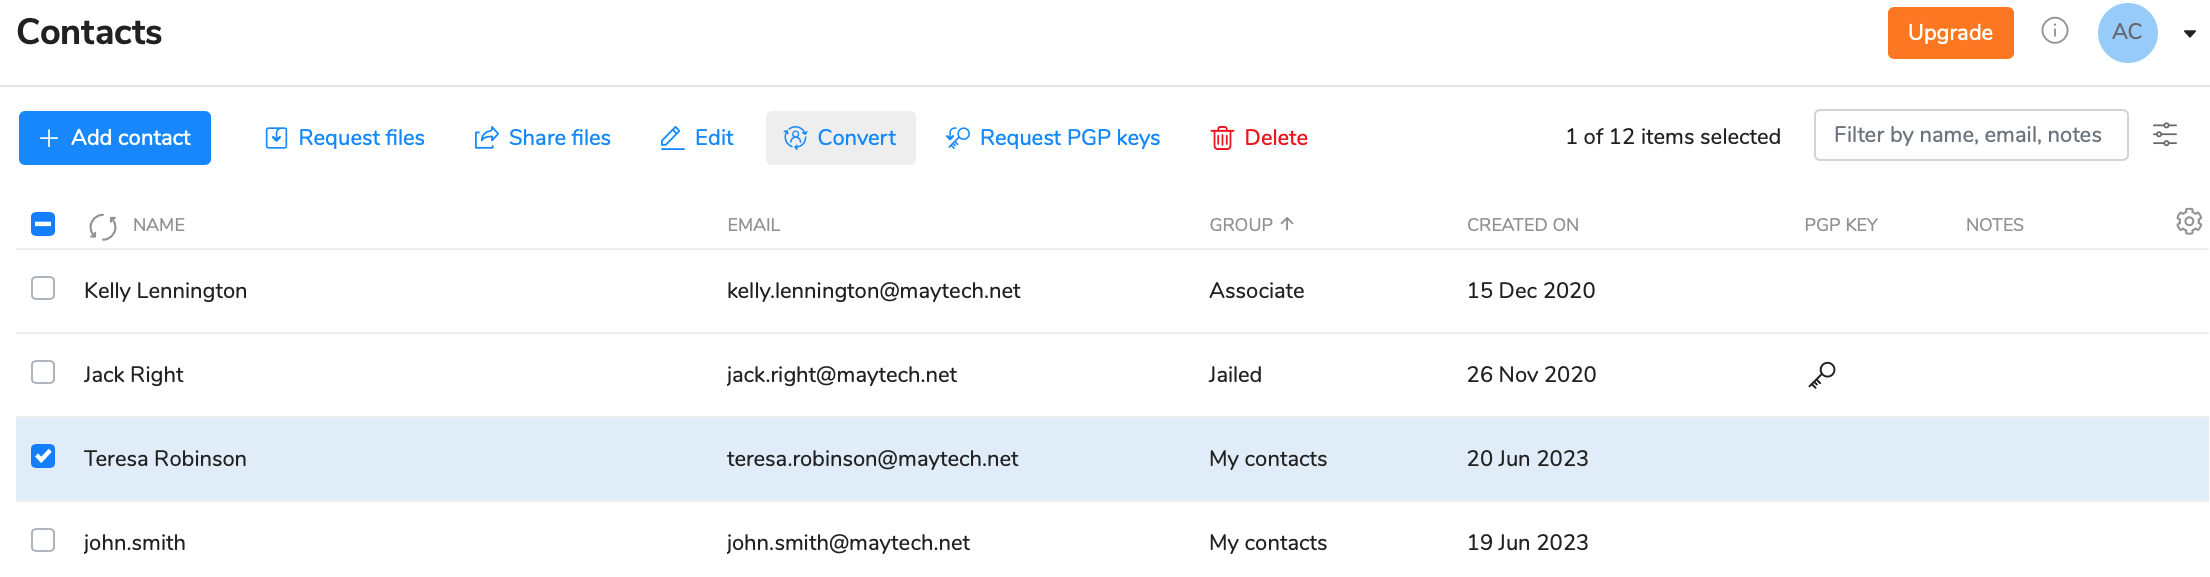
Converting a contact to a user
If you shared files with someone whose email wasn't used in Quatrix account, this email is automatically written to My Contacts list. You can easily convert your contact (either My or Site) to any user (Pro user - by default) by selecting the contact and clicking on the Convert button on the menu or selecting an appropriate menu option from the right-click menu.
The conversion of users to contacts is not possible.
User visibility management
User visibility module is available on request.
This feature enables account owners and administrators to create and manage user links which provides better user visibility and leads to more accurate user management.
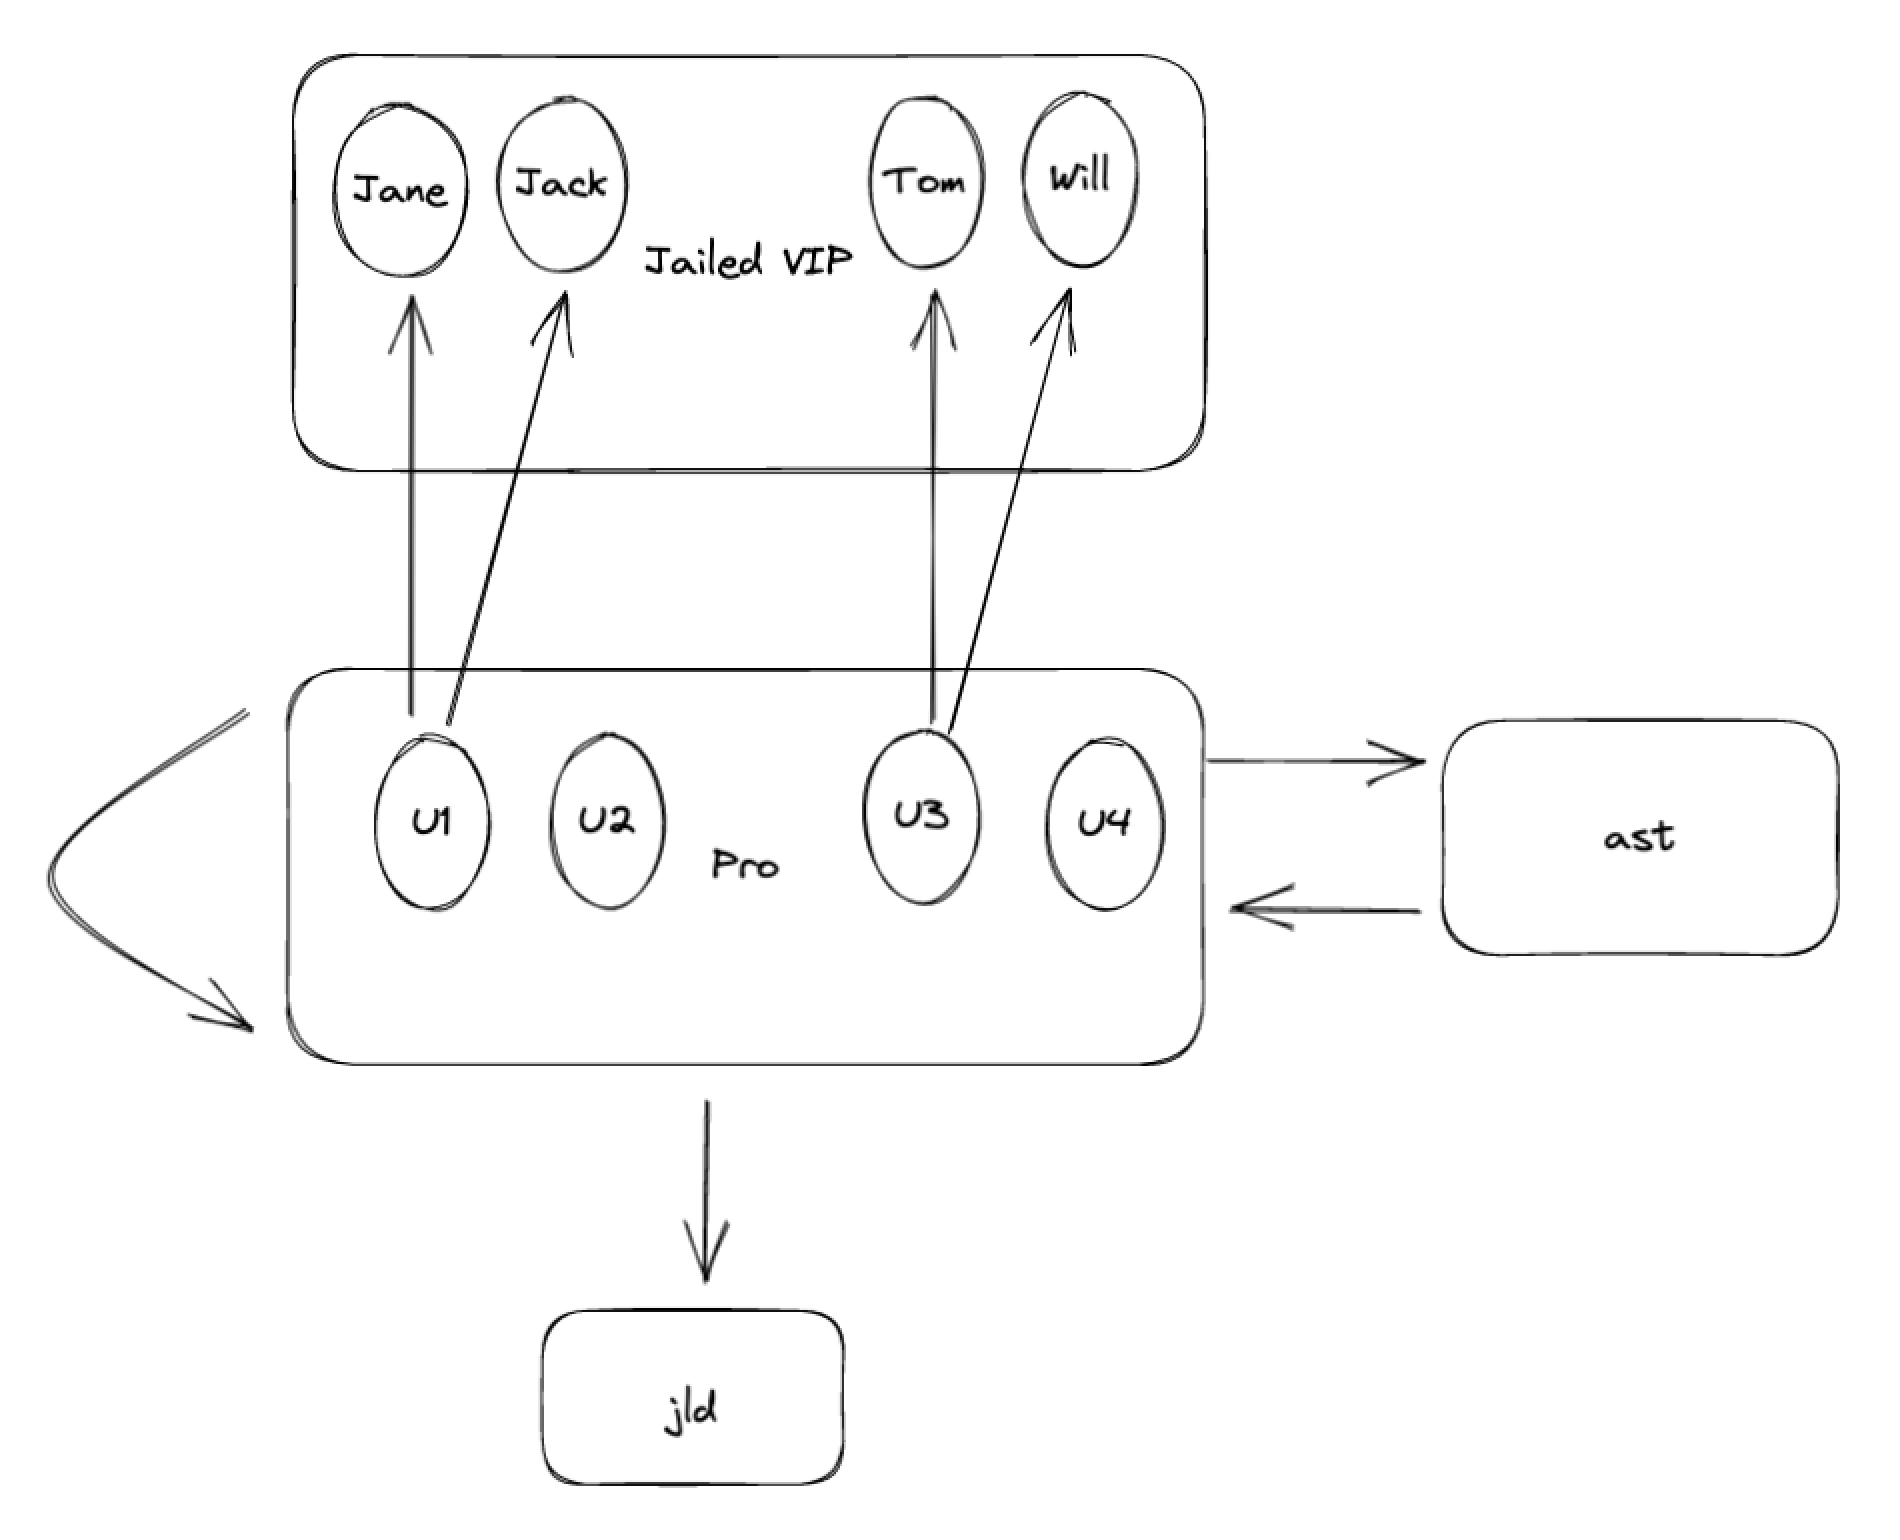
The diagram above illustrates how this feature works. If you created a special group of users called Jailed VIP, and isolated them from other users in the account by setting required permissions, their visibility will be limited. Users of the default Pro group can see all members of the Jailed group by default, but at the same time Pro users cannot access any of the users from the Jailed VIP group. But if you want to dig deeper and manage visibility on the user-to-user basis, e.g. allow the Pro user 1 see only Jane and Jack from the Jailed VIP user group, user-to-user visibility feature is what you need. It allows setting a required visibility to individual users of the group rather than assigning required visibility to all group members.
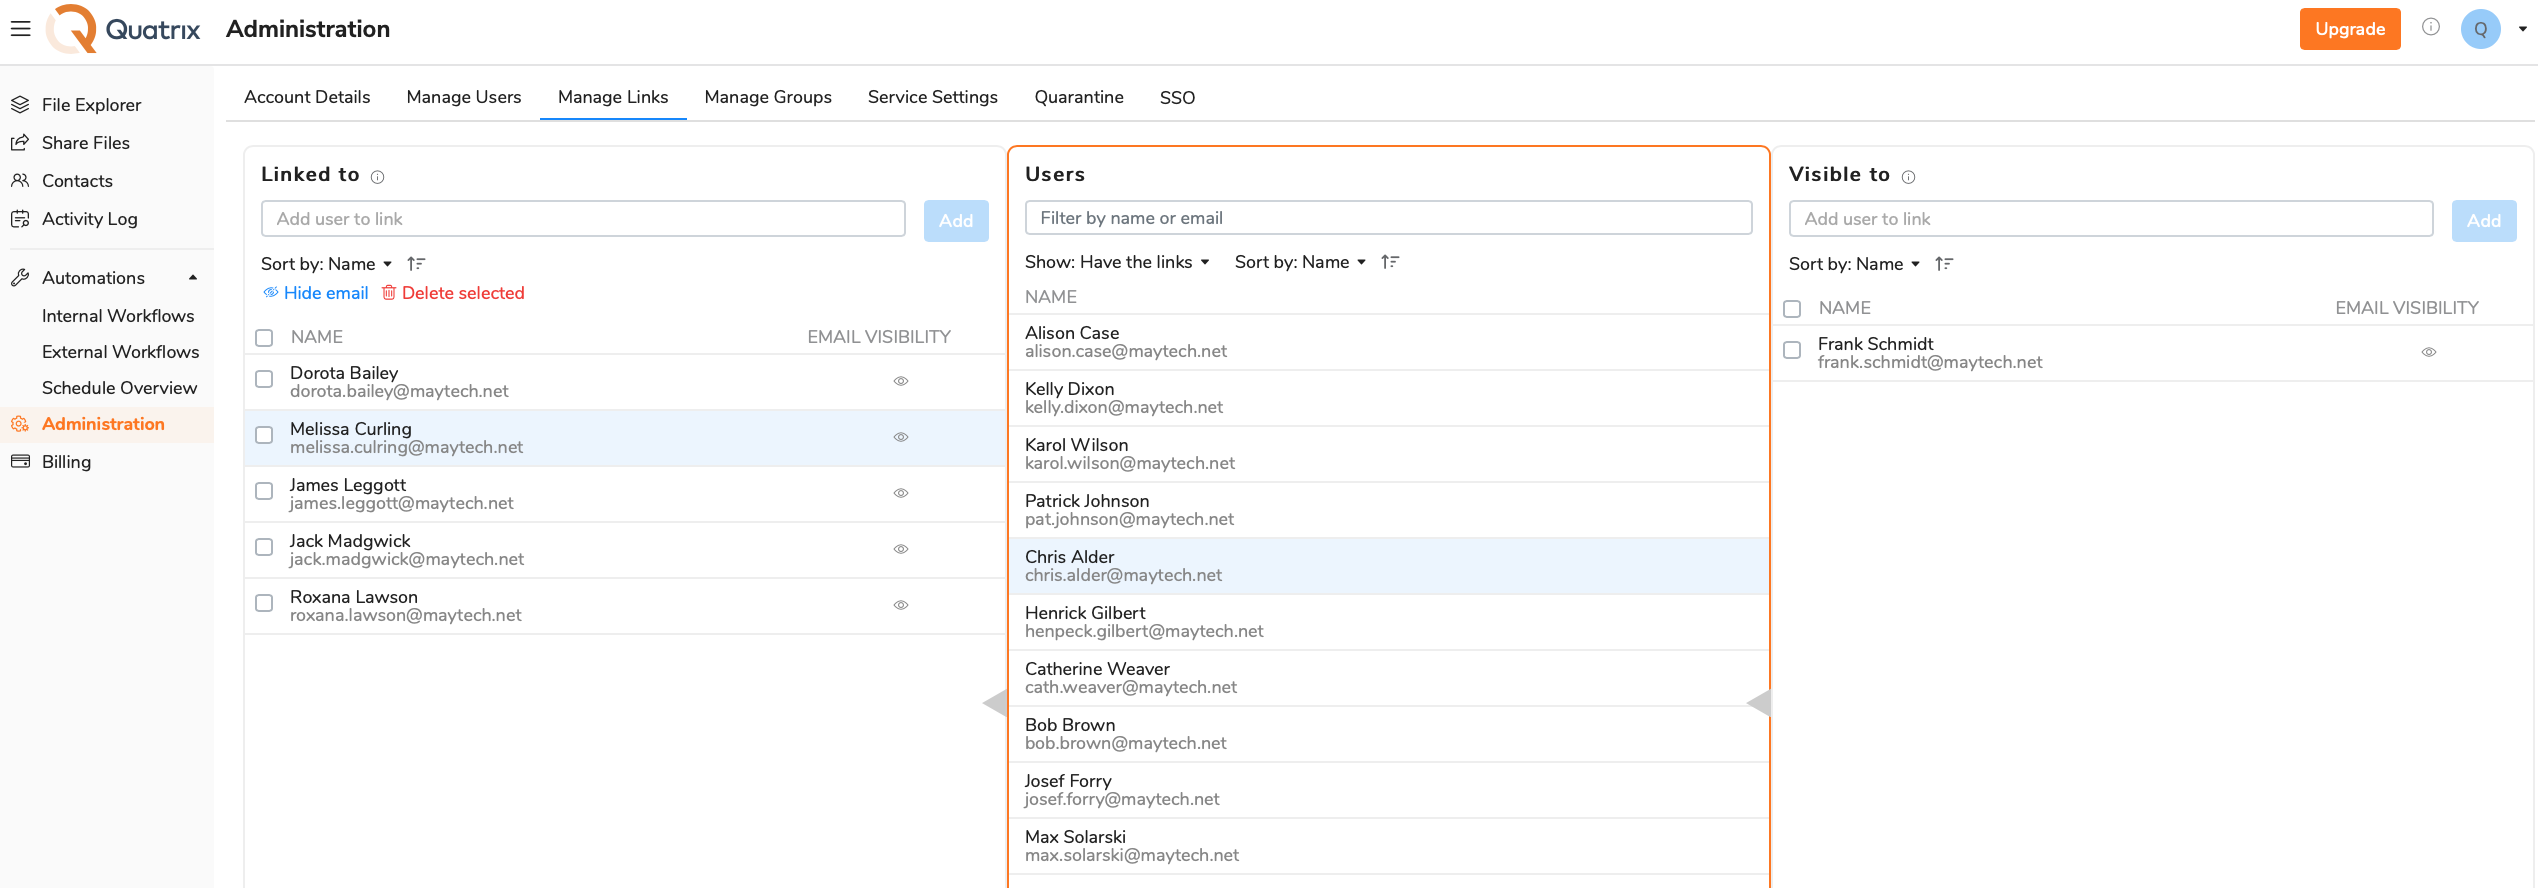
You can manage user links and adjust appropriate user visibility on the Manage links sub-tab of the Administration tab.
Select the user in the middle column.
This column can be sorted by Name or availability of links which makes your search easier.
- Manage users that are linked to this user in the Linked to column.
- To add a user, type the email in the Add user to link field and click on Add button.
- To delete a user, select the one and click on Delete selected button.
To manage email visibility, click on Hide email which will display only the name.
If you select Hide email, only PF sharing will be allowed, as other actions in the account, e.g. file sharing or other actions, require emails for performance.
- Manage users who can see the selected user in the right column.
- To add a user, type the email in the Add user to link field and click on Add button.
- Save changes.