Account security settings
We care for the protection of your account security. Here are some tips to help you set up your account securely.
Create strong and unique passwords
A strong password is the one that you can easily remember, but the hacker will never guess. In order to ensure strong password security for users, Quatrix password must conform the following rules:
- be at least 8 characters long.
- include lowercase and uppercase alphabetic characters, numbers and symbols.
- not be a common dictionary word, email address or any information associated with the account.
- should be unique, different from the previous passwords.
Change your passwords from time to time
If you would like to keep your passwords secure, try to change them regularly and never repeat previously used passwords.
Follow the steps below to change your account password:
- Click on the link with your name at the top right and follow the Manage profile link.
- Open the Security sub-tab and click on the Change password button.

- Type in your current password and then generate a new one.
- Save your password.
If you forgot your password, follow the Forgot password link on the Account Login page and follow the instructions sent by email to reset the password.
Force password reset for account users
Account owners and admins can keep Quatrix account secure by requiring their users to reset passwords.
To send a password reset request:
- Go to the Admin panel and open the Users tab.
- Select users you would like to change their passwords and click on the Password reset option from the above or right-click menu.

- Click on the Send button.
Your users will receive emails with the links to reset their passwords.
Turn on 2FA verification
Two-factor authentication (also known as two-step verification or 2FA) adds a second layer of security to your online file sharing. Every time you log in to your Quatrix account, you will need to enter a six-digit security code using your phone or other mobile device in such a way verify your identity. This prevents anyone but you from logging in, even if they know your password. For more information on how to enable or disable 2FA see our User Guide.
Force 2FA for account users
The account owner or administrators can enforce 2FA either for one user, or a group of users, or for all users of the account.
If you would like to force 2FA only to a definite user or a group of users, go to the Administration tab and tick the check box next to the user(s) and select the Force 2FA icon from the drop-down menu or choose an appropriate icon from the above menu.
To make 2FA mandatory for all users on the account level follow these steps:
- Go to the Service Settings tab on the Admin panel.
- Go to the Security section and tap the toggle from off to on next to the Force 2FA.

- Click on the Save button.
Set IP address restrictions
As the owner or administrator, you can use the IP Restriction setting to prevent users in your company from logging in to your Quatrix account from any unauthorized locations. You can specify the range of IP addresses (or networks) to allow connection to Quatrix both via HTTPS and SFTP protocols.
To restrict IP addresses that have access to the account:
- Go to the Admin panel and open the Service Settings tab.
- To activate IP address restrictions tap the toggle from off to on next to IP restriction.
Specify a list of IP addresses in any of the allowed formats: 10.10.1.1; 10.10.1.1-15; 10.10.1.4/30.

You must include your current IP address to the list before saving the IP filter configuration.
- Save changes.
Your users with the listed IP addresses will have access to your account, the others won't be able to log in to Quatrix.
If you would like to deactivate IP restrictions, switch the toggle to off state. This returns the access to your account for all your available users.
Adjust PIN code user registration access
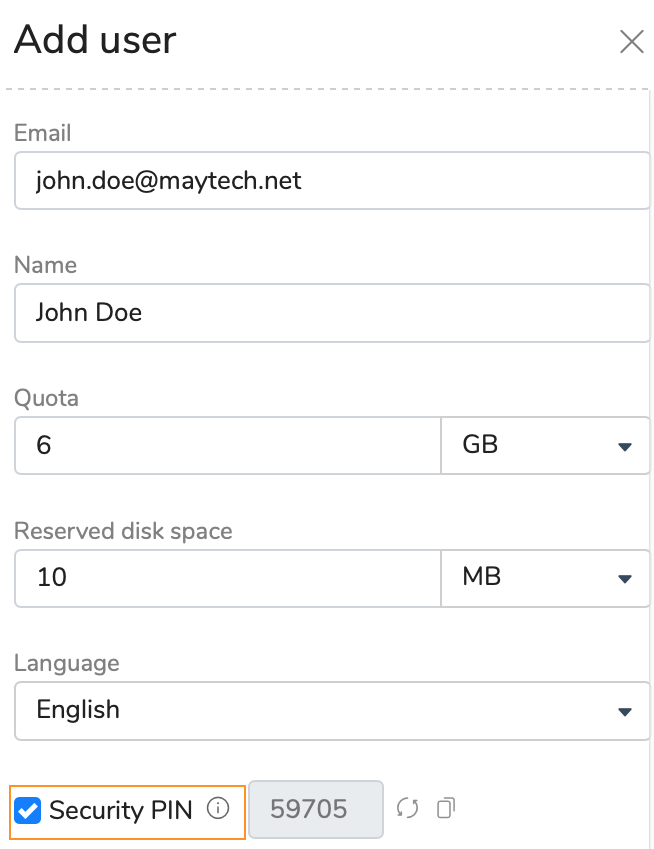
If you add a new user to your account, you can use the Security PIN feature that allows you to check if the person you intend is registering for the account.
To use this feature, you need to check the Security PIN check box while adding a user and share this PIN code in the most secure way.

Your user will perform 3 steps instead of 2 ones to register for the account.
- Follow the one-time link form the email to set the password.
- Log in to the account with the already set password and email.
- Enter PIN code to access the account.
The security PIN is randomly generated and cannot be changed. Save this PIN until your user is registered. If your user loses your shared PIN, you can share your saved PIN code and omit the repetition of adding this user with PIN code again.
For security reasons, we are not allowed to tell the user if they have entered an invalid user name, password, or PIN. If they have forgotten their password, they should go to the Log in page and follow the Forgot password link. If the PIN code is incorrect, the user should contact the administrator mentioned in the email.
Control access to your account by assigning a user group or administrator permission
The access to your account can be managed by assigning a specific user group to your users or by granting administration rights.
You can organise your users into groups with necessary sharing and access permissions. The following 3 predefined user groups are created by default:
- Pro Users can view and share files with other Pro users, Associate users and site contacts. Besides they can create a list of their own Personal Contacts that are invisible to you as the administrator.
- Associate Users can view only Pro users and share files with them. They cannot share to the outside world. This facilitates the flow of data from external partners into your organisation whilst preventing external partners from making unauthorised use of your Quatrix site.
- Jailed Users have access to files from Projects Shared With Me
Learn more about user groups and their permissions in our User guide.
You can let your users perform account management tasks by granting them administration rights. This can be done while adding or editing a user by checking the Administrator check box. Users with administrative privileges have access to the Administration tab and can manage the access to your account.
Get copy of all shares via BCC

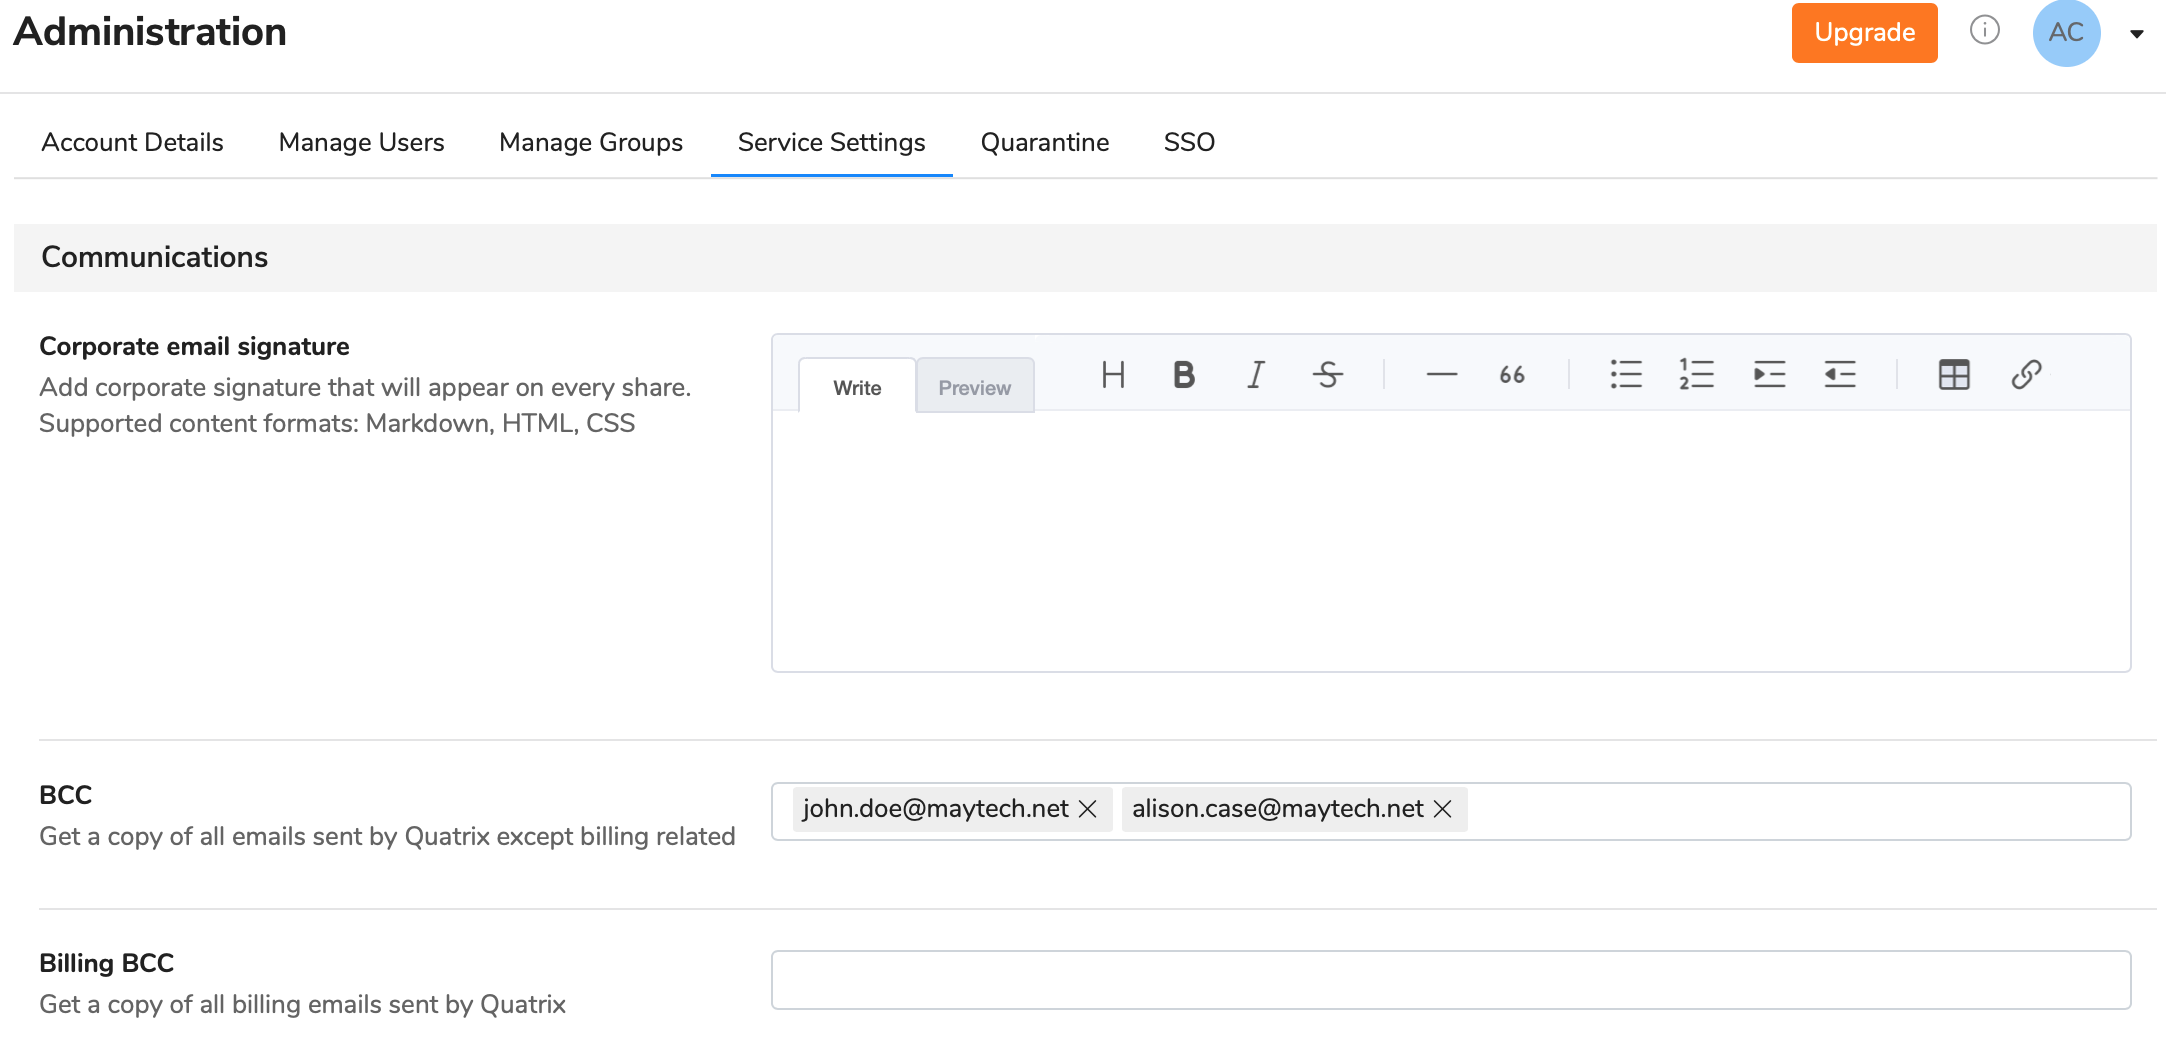
Blind carbon copy (BCC) allows you to specify recipients that will receive a copy of all shared files through Quatrix. They will get emails secretly, i.e. emails will be invisible to others.
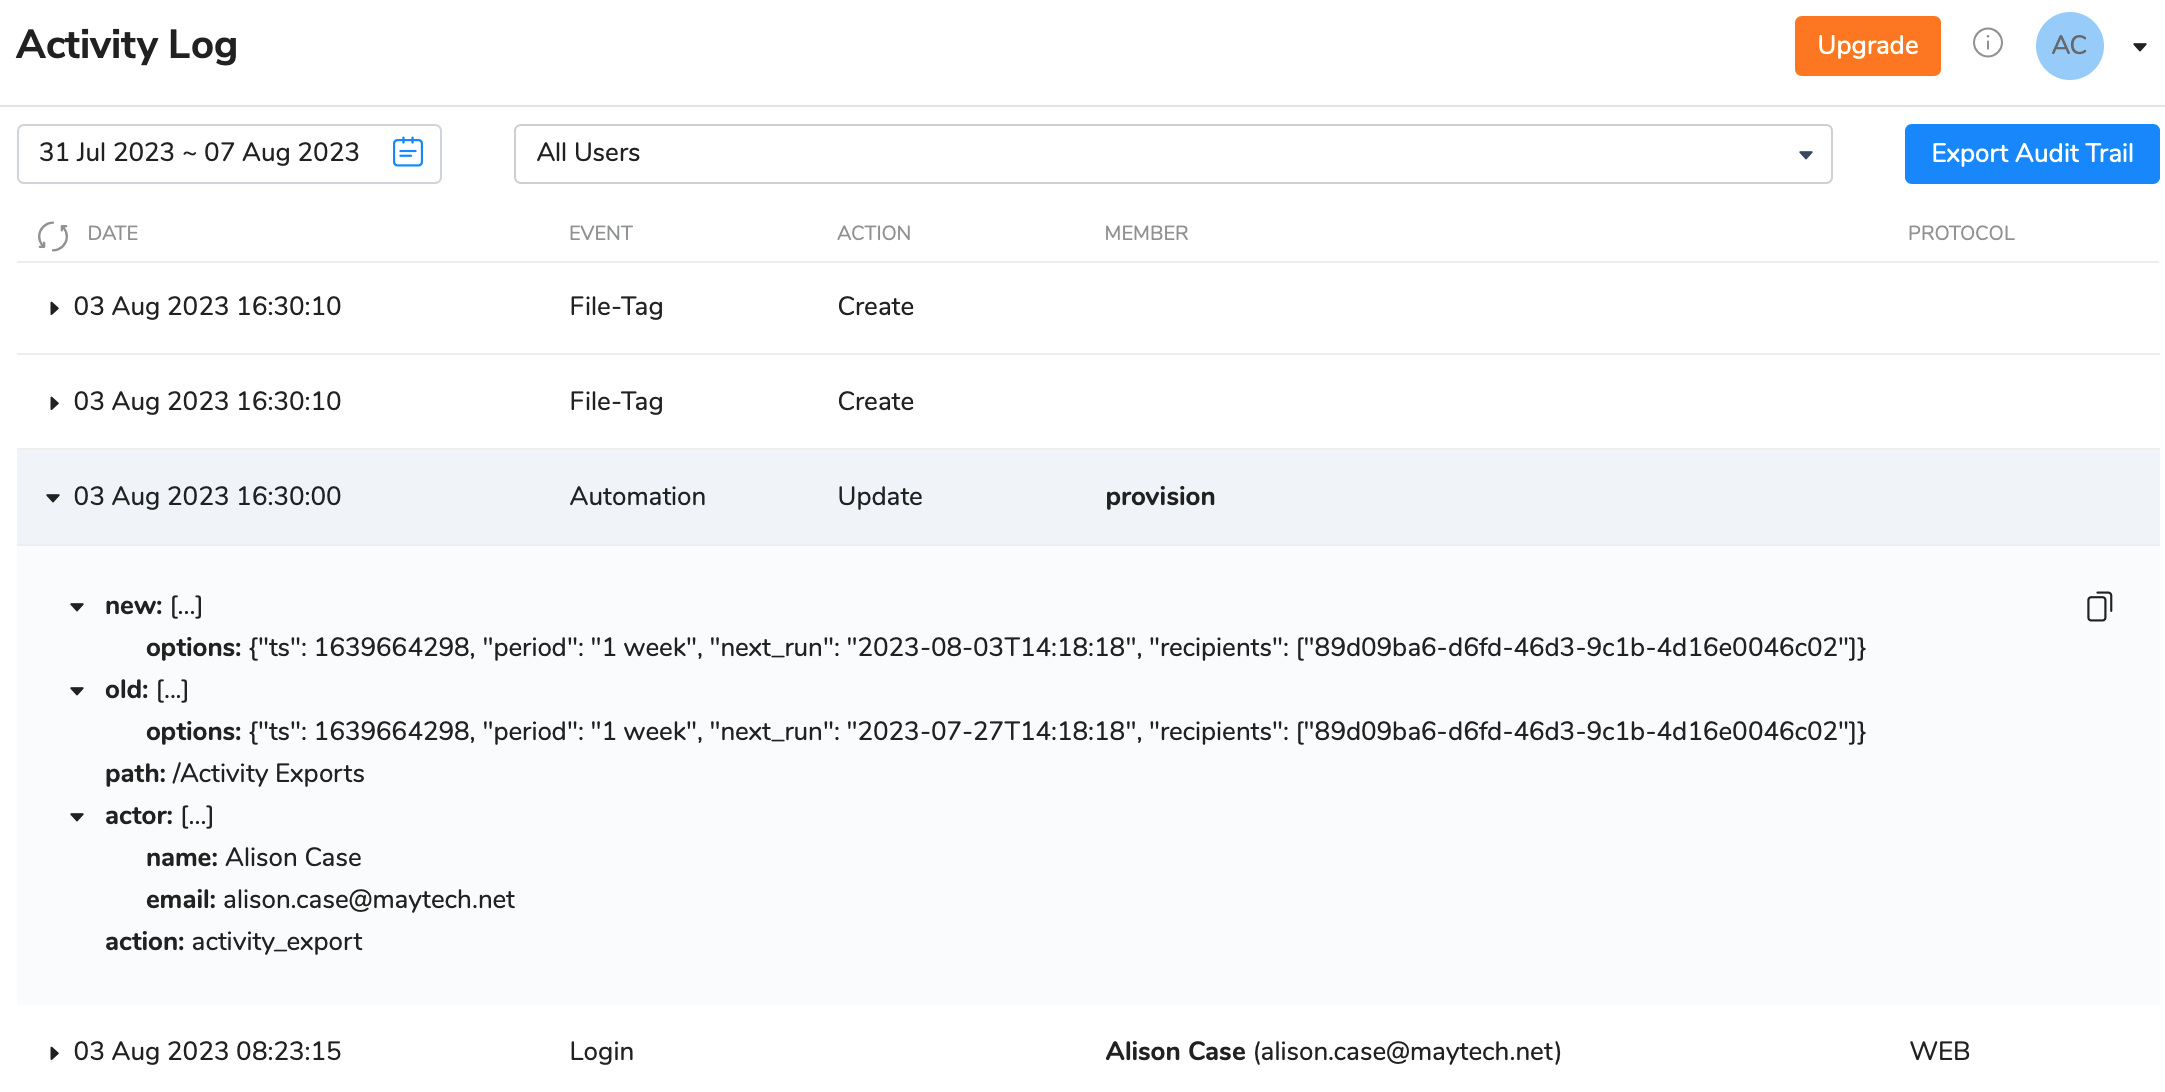
This feature is useful if you would like to keep track of all sharing actions in your account. To get more details of your account activity history, download the account activity log that displays all actions performed in your account on the Activity Log tab.
BCC can be adjusted by the account owner or administrators on the Administration tab. The recipients in the To field will not know that the others on the BCC field are secretly receiving shares.
BCC recipients get copies of all emails, except the ones that are security related, e.g. password reset emails.
Billing BCC allows recipients to receive all billing related emails: upgrade or downgrade details, etc.
Track activity history in your account

The activity log tracking allows to get an extremely detailed record of all activity from all users within a specified date range. The activity log displays individual actions of users including:
- date and time they logged in and out
- user actions within Quatrix platform
- shared and accessed files
- any updates or changes.
The main goal of audit trail reports is to assist account owners or administrators find out what their users are doing with files while they are logged in to Quatrix platform, providing complete visibility and added peace of mind. The audit log displays cases with multiple log-in attempts to the account which gives administrators information about potential security threats. Besides, if there were made any unauthorized changes to files, the log will determine which user made these changes.
Overall, activity logs provide owners or administrators the tool for getting a better vision of how files within Quatrix platform are being used.
Learn more about Activity Logs.